FAQ’s
Frequently Asked Questions

What to learn how to do something?
We have built a comprehensive FAQ (Frequently asked Questions) page, that is based up on the actual questions our customer service teams get asked, and we are always adding to and improving them, so if you think there is something missing, please let us know.
We have tried to answer the questions in a clear and concise way and then grouped them into the section of the popcorn that they are related too. Where possible, we are also adding bite sized videos, showing you how to do it, so you can get up and running as fast as possible.
Want to learn more stuff?
CRM Onboarding
Prospecting Onboarding
In-depth Training
Expert Interviews
Tips & Advice
FAQ's
Please click on any of the boxes below to be taken to specific questions about that feature.
PROSPECTING FEATURES
AGENCY FEATURES
Dashboard
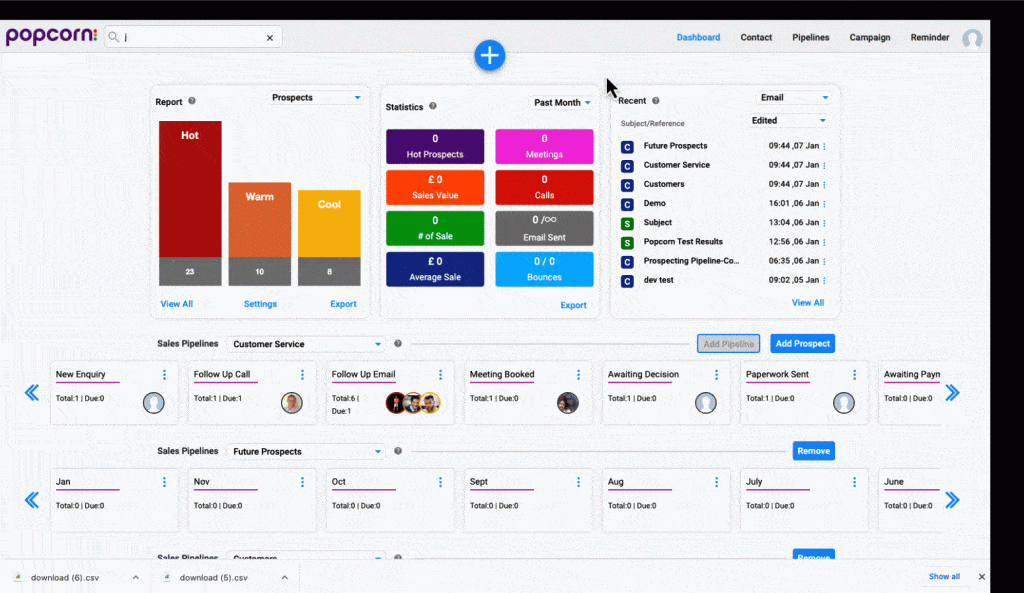
The ‘Dashboard’ gives you an overview of everything you need to know and access in one place.
The ‘Dashboard’ gives you an overview of everything you need to know in one place, including:
Quick Search – This is always at the top left-hand side of the page and allows you to instantly search for a contact, simply type the contacts name, company, email address or phone number into this box to put their information up.
The ‘+’ button – gives you quick access to create the most commonly used activities inside popcorn.
‘Reports’, Statistics’ and ‘Recent’, all of which are explained in the below FAQs.
Pipelines – add up to 3 pipelines to the dashboard for an overview of all the activity.
The ‘Dashboard’ gives you an overview of everything you need to know in one place, including:
Quick Search – This is always at the top left-hand side of the page and allows you to instantly search for a contact, simply type the contacts name, company, email address or phone number into this box to put their information up.
The ‘+’ button – gives you quick access to create the most commonly used activities inside popcorn.
‘Reports’, Statistics’ and ‘Recent’, all of which are explained in the below FAQs.
Pipelines – add up to 3 pipelines to dashboard for an overview of all the activity.
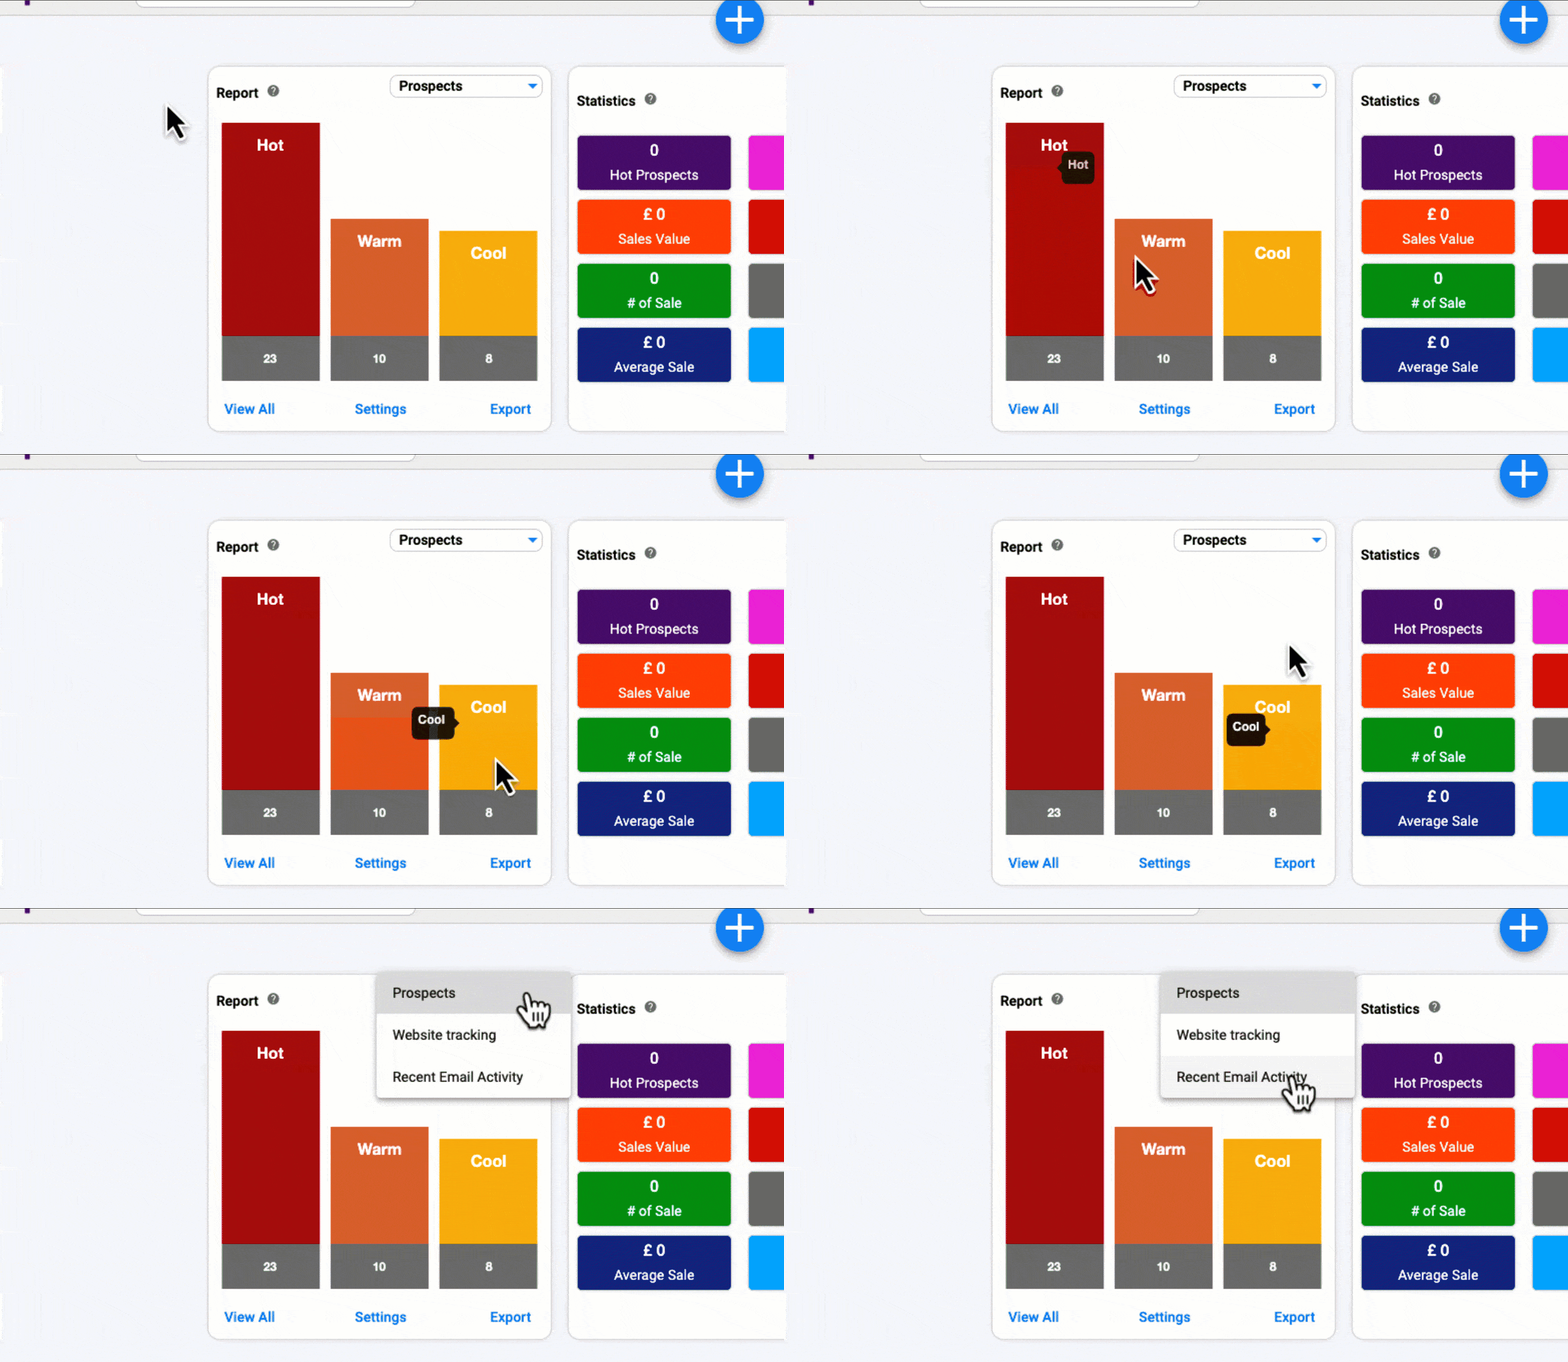
The ‘Reports’ box on the Dashboard gives you quick access to the following reports:
Hot, Warm and Cool Prospects – These are automatically generated by tracking and scoring your contacts’ activities over Email Marketing Opens, Clicks, Website Visits and return visits to specific pages.
‘Prospect’ scores are averaged out over the last 3 emails a contact has received, so you will see contacts move around the ‘Hot’, ‘Warm, and ‘Cool’ scales.
Website Tracking – If you are signed up to the ‘Prospecting’ package, once a contact opens an email sent from popcorn, it automatically tracks the specific pages and contact visits on your website for up to 3 months after their last email open.
Recent Email Marketing Activity – An overview of the last 7 days Email Marketing activity by your clients.
All the above reports are fully clickable, to give you details of specific users.
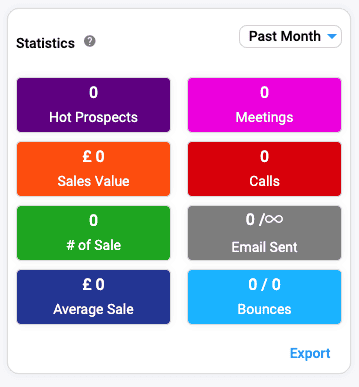
The ‘Statistics’ box gives you an overview of all the activity that you have done over the set period of time (this can be changed via the drop-down in the top right). Which include:
Hot Prospects – The total number of Hot Prospects generated.
Meetings – The total number of meetings you have recorded in the contact popup’s ‘Meeting’ notes.
Sales Value – The total value of sales that you have reported in contact ‘Sales’ Notes.
Calls – The total number of Calls that you have reported in contact popup’s ‘Call’ Notes, or via ‘Call’ in the ‘+’ menu.
# of Sales – The total number of sales that you have reported in contact ‘Sales’ Notes.
Emails Sent – This shows you how many emails you have sent and how many you have available from your allowance.
Average Sale – The Average sales value of a sale that you have reported in contact ‘Sales’ Notes. This is calculated by dividing the ‘Total Number of Sales’ by the ‘Number of Sales’
Bounces – The total number of Email Marketing Bounces that you have been recorded. This includes both ‘Soft and Hard’ Bounces.
The ‘Export’ button, allows you to Export the top level statistics into a CSV file.
The ‘Recent’ box gives you quick access to:
Email Marketing – Your most recently Edited/Created emails.
Reminders that are due in the defined period of time (adjustable via the dropdown). Clicking on a reminder will open the specific contact’s popup and take you directly to the reminder, or you can click on the 3 Blue Dots to quickly manage it.
Sales pipelines give you the ability to recreate your sales process in a highly visual and customisable way.
You can find them both on the Dashboard, inside campaigns and under the Pipelines tab at the top of the logged-in page.
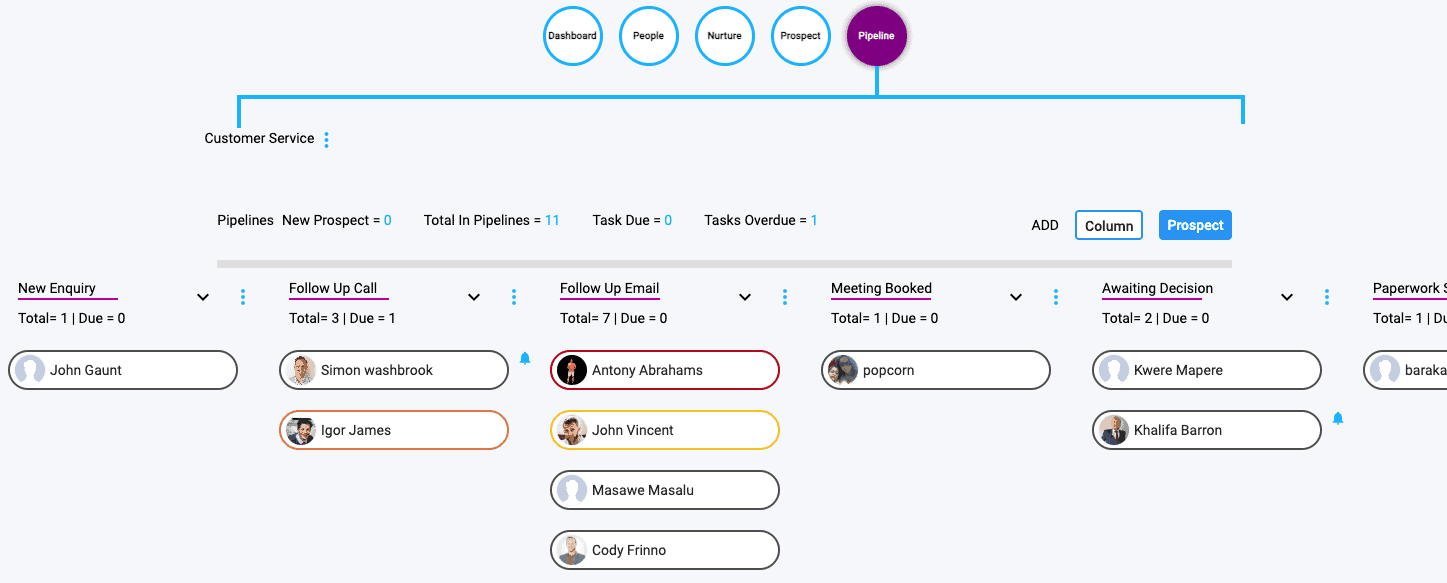
‘Pipelines’ are based inside ‘Campaign’ folders – you can create as many pipelines as you like, and access them via the ‘Campaign’ section at the top of the page.
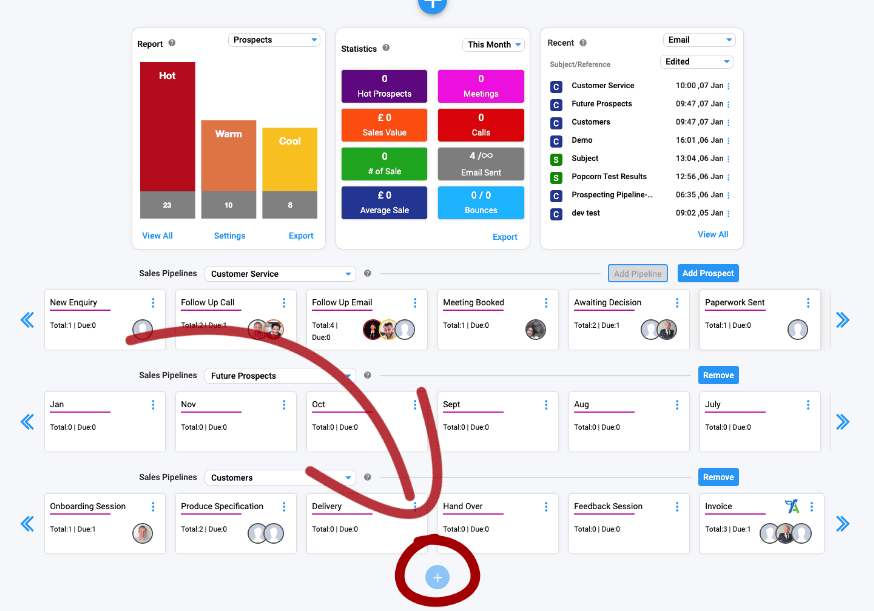
You also then have the ability to add up to 3 ‘Pipeline Summaries’ to your main ‘Dashboard’. This can be achieved, by clicking on the Blue ‘+’ circle at the bottom of your dashboard.
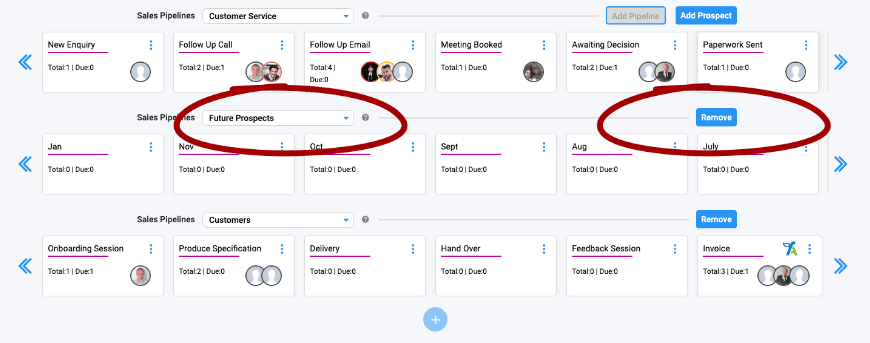
To change the ‘Pipelines’ you view on your ‘Dashboard’, simply click the drop-down menu above the ‘Pipeline’ to select a new one, or you can remove a specific ‘Pipeline’ from the ‘Dashboard’, by clicking on the ‘Remove’ button to the right hand side of the page. This will only remove it from the ‘Dashboard’ view and will not delete any data/campaigns.
The Dashboard, is brilliant for giving you an overview of your pipelines, but if you want to drill into the details, you need to go into the specific campaign folder. You can do this by either:
Clicking on the pipeline in the dashboard / pipelines page, which will load you straight into the pipelines tab.
or
Click into the campaigns page and select the specific campaign you want. If you do it this way, you will then need to click on the Pipelines tab.
We currently limit the number of pipelines you can compare on the Dashboard to 3. Although, we are planning to increase this in the future.
There is no limit to the number of columns you can add to a pipeline.
We only recommend you keeping it to a useable size for yourself, often it can be easier to break your pipeline down into separate pipelines. That way it is easier to keep track of everyone and they can be viewed together on the Dashboard.
You can add a prospect to a pipeline in 3 simple ways:
- When you add a new contact via the ‘+’ menu, simply select the pipeline you want to add it to at that point.
- When you are viewing the pipeline, click on the ‘Add Prospect’ button and select the pipeline you want to add them too.
- When you are in the Contact Popup, click on the targeting tab and add them to a pipeline
When using any of the above methods, you can always choose specific columns and positions in the pipelines.
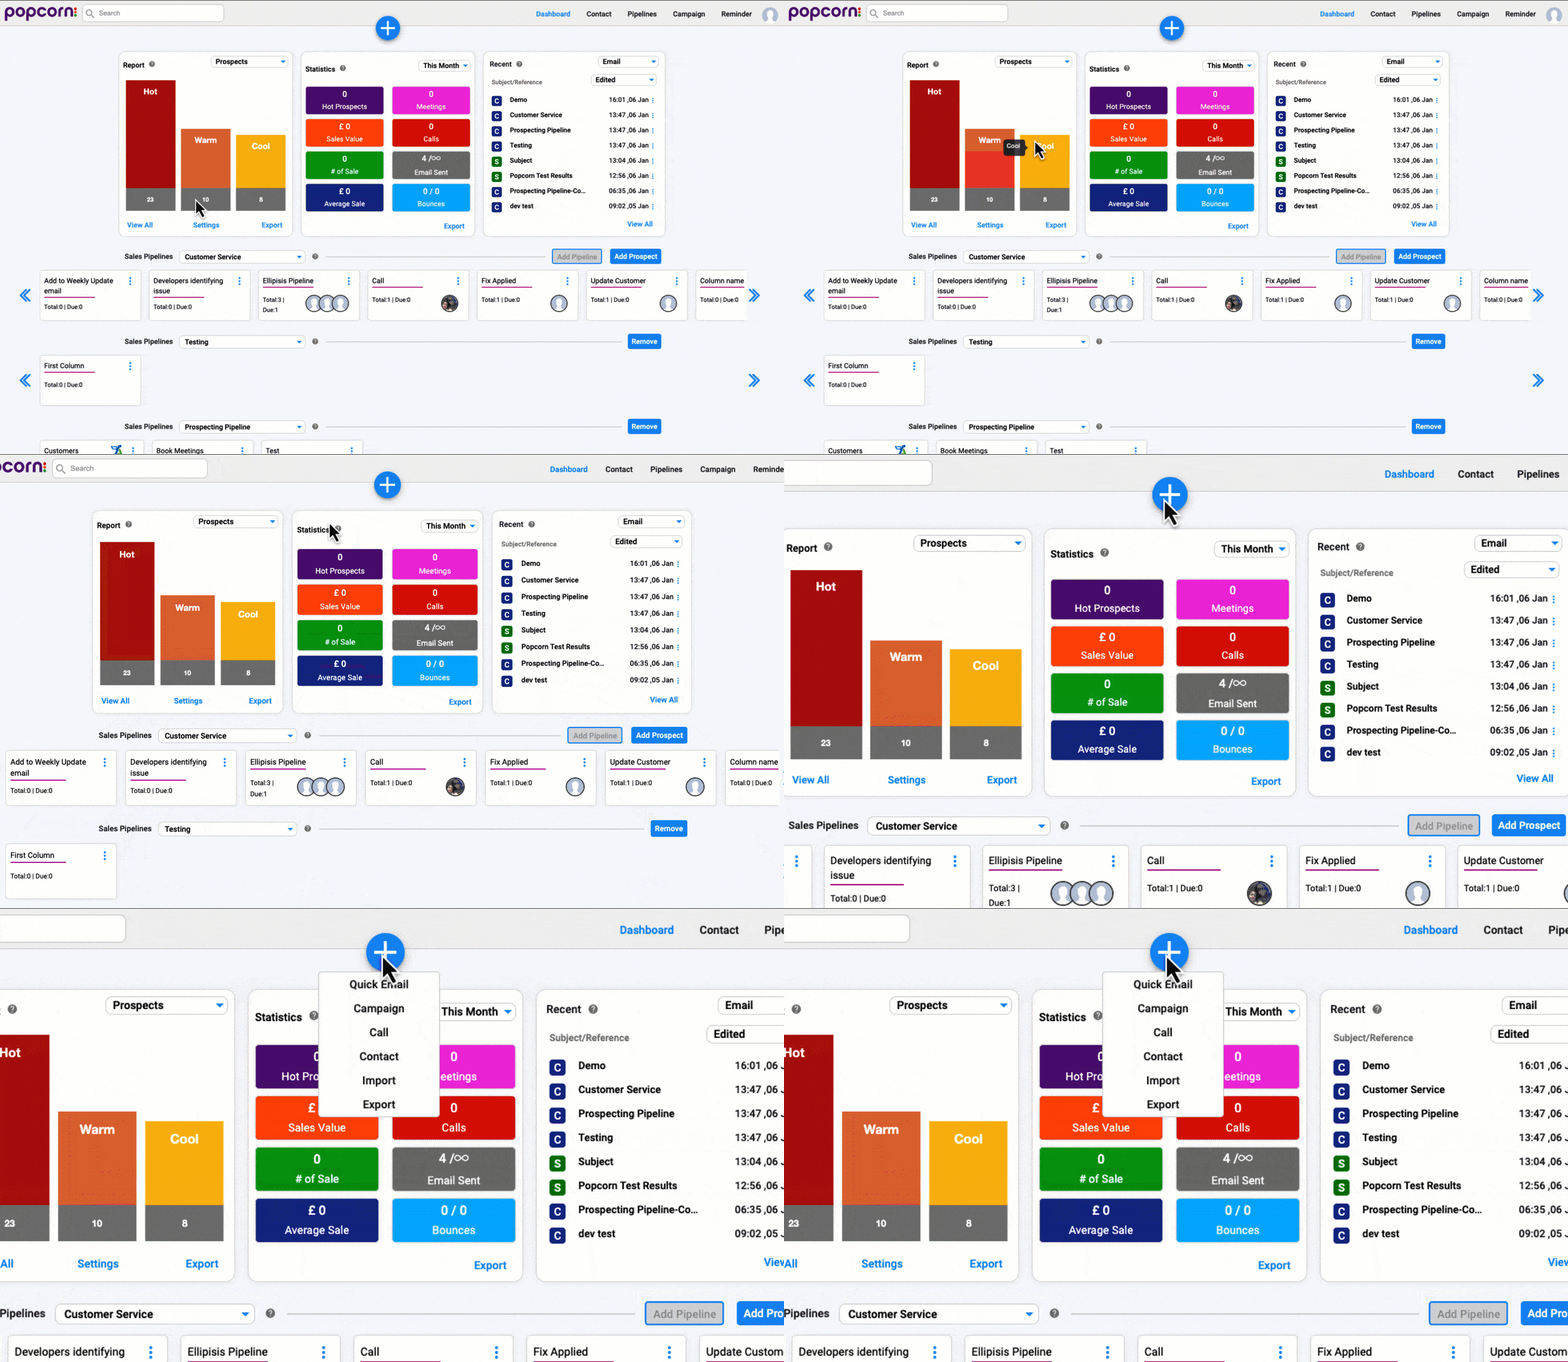
The ‘+’ button, also known as the quick menu is always at the top of the page, whenever you are logged into popcorn CRM. Click on this to quickly:
– Create a Quick Email
– Create a New Campaign
– Add New Contact
– Log a phone call
– Import new data
– Start a full system Export
To change the name displayed in the pipelines from the individual’s name to a company name.
Simply click on the contacts name to popup their profile, Click Edit, Tick the box next to the company name and then Save.
Next time the pipeline page is refreshed, the company name will be displayed.
popcorn is the Official CRM partner of FreeAgent, and we have developed integrations. When you see the FreeAgent Logo at the top of a “Pipeline’, it tells you that any contacts added to it will be synced over to FreeAgent. This can be set up in your account settings.
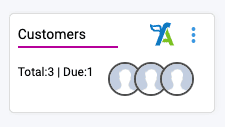
The outer colours of the contact lozenge rings represent prospect levels.
This is an automated process when you are using the Prospecting package, as it tracks and scores behaviour across Email Marketing, Website activity and Website return visits.
Red = Hot Prospect
Orange = Warm Prospect
Yellow = Cool Prospect
Grey = Not a Prospect
The scoring can be modified in account settings.
CRM
The ‘Statistics’ box gives you an instant report of all the activity that you have completed over defined periods of time.
Please click on a short cut to jump to the info you are looking for:
General Information
Accessing the CRM in popcorn is really simple.
Whenever you see a contact’s name, anywhere in popcorn CRM, simply click on it to bring up the ‘Contact Pop-up’. This is where we store everything about your contact, from Notes & Reminders, through to Tagging & GDPR Subscription preferences.
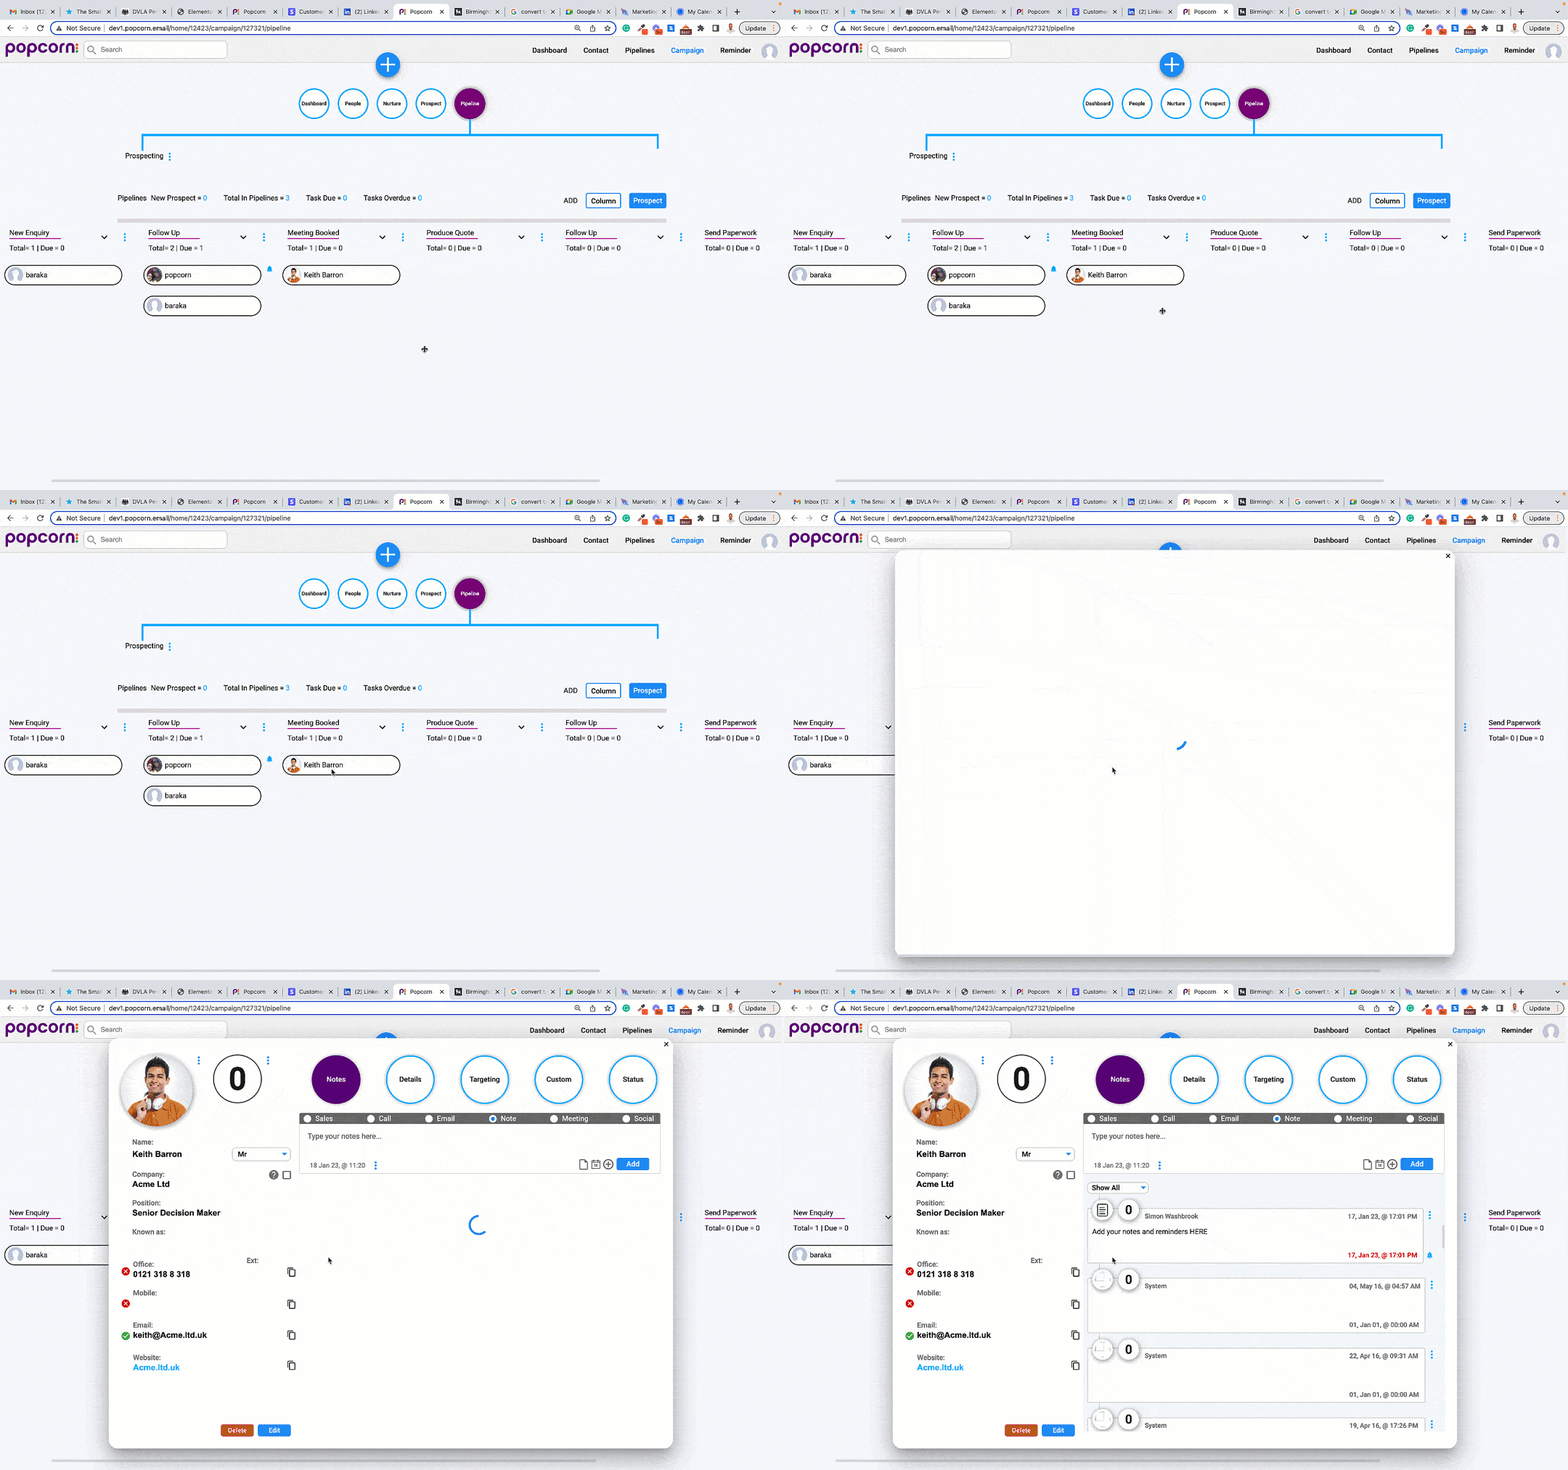
Within the ‘Contact Pop-up’, there are 5 Tabs – here are some quick explanations of the purpose of each of them, for more detailed information, please click on the specific sections to the left of this.
- Basics – This is the section to the left of the tabbed sections, it has the contact’s basic contact information and is always there.
- Notes – This is where you can add your notes and reminders into a simple timeline. When you add a ‘Note’ you can easily define it as a Sale, Call, Email, Note, Meeting or Social, and then filter them based upon these clarifications.
- Details – An extended section of the Basic contact details.
- Targeting – A section where you can apply and manage ‘Tags’, as well as the ‘Pipelines’ your contacts are in.
- Custom – Personalise the fields that popcorn tracks, all these fields can then be used as part of the Personalisation in the ‘Email Marketing’ tools.
- Status – A place to see and manage every Email or Campaign that the contact is connected to, and the ability to manage their subscription preferences.
To update a contact photo, simply click on the 3 blue dots, next to the profile photo and then upload it from your computer.
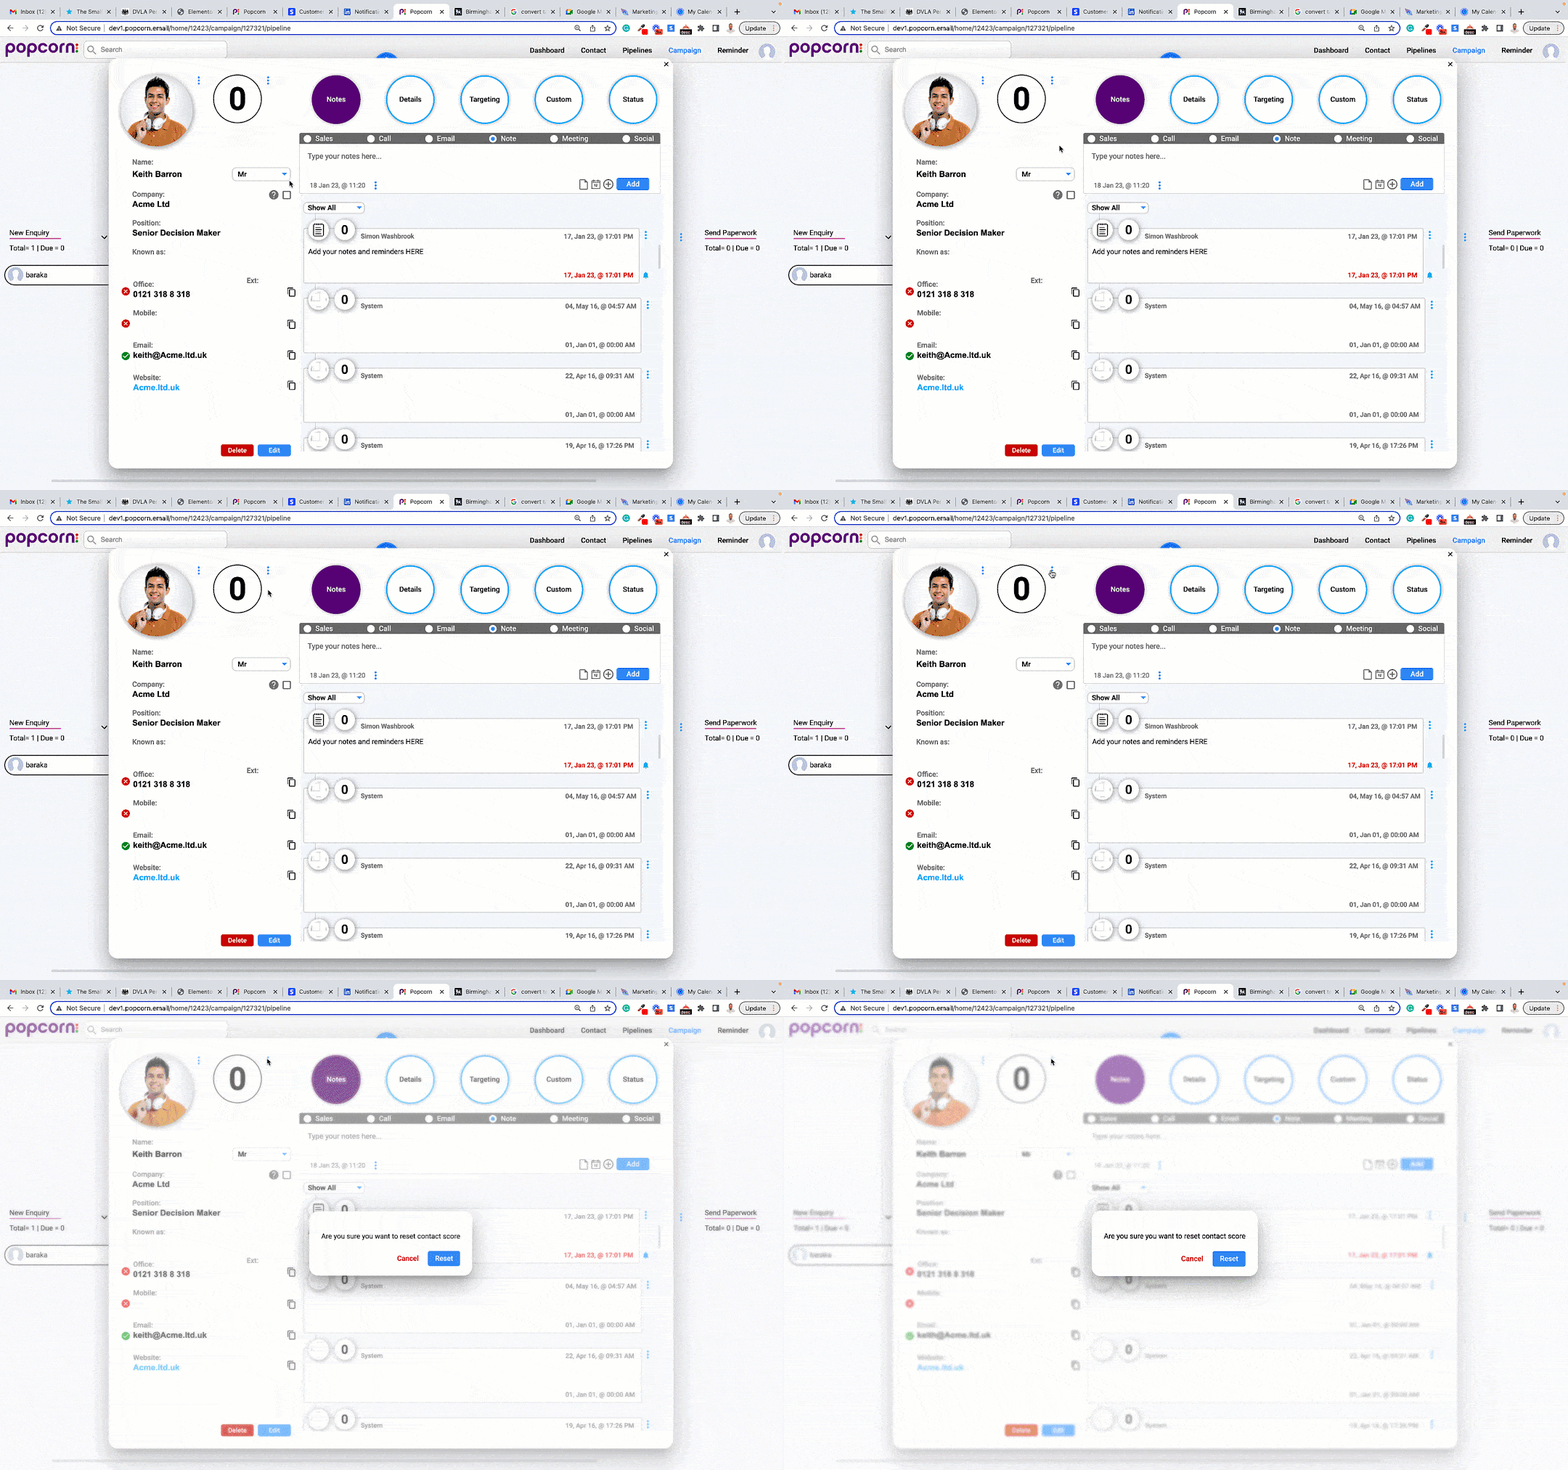
Resetting the Activity Score is simple, just click on the 3 Blue Dots to the right of the Score and click the Reset button.
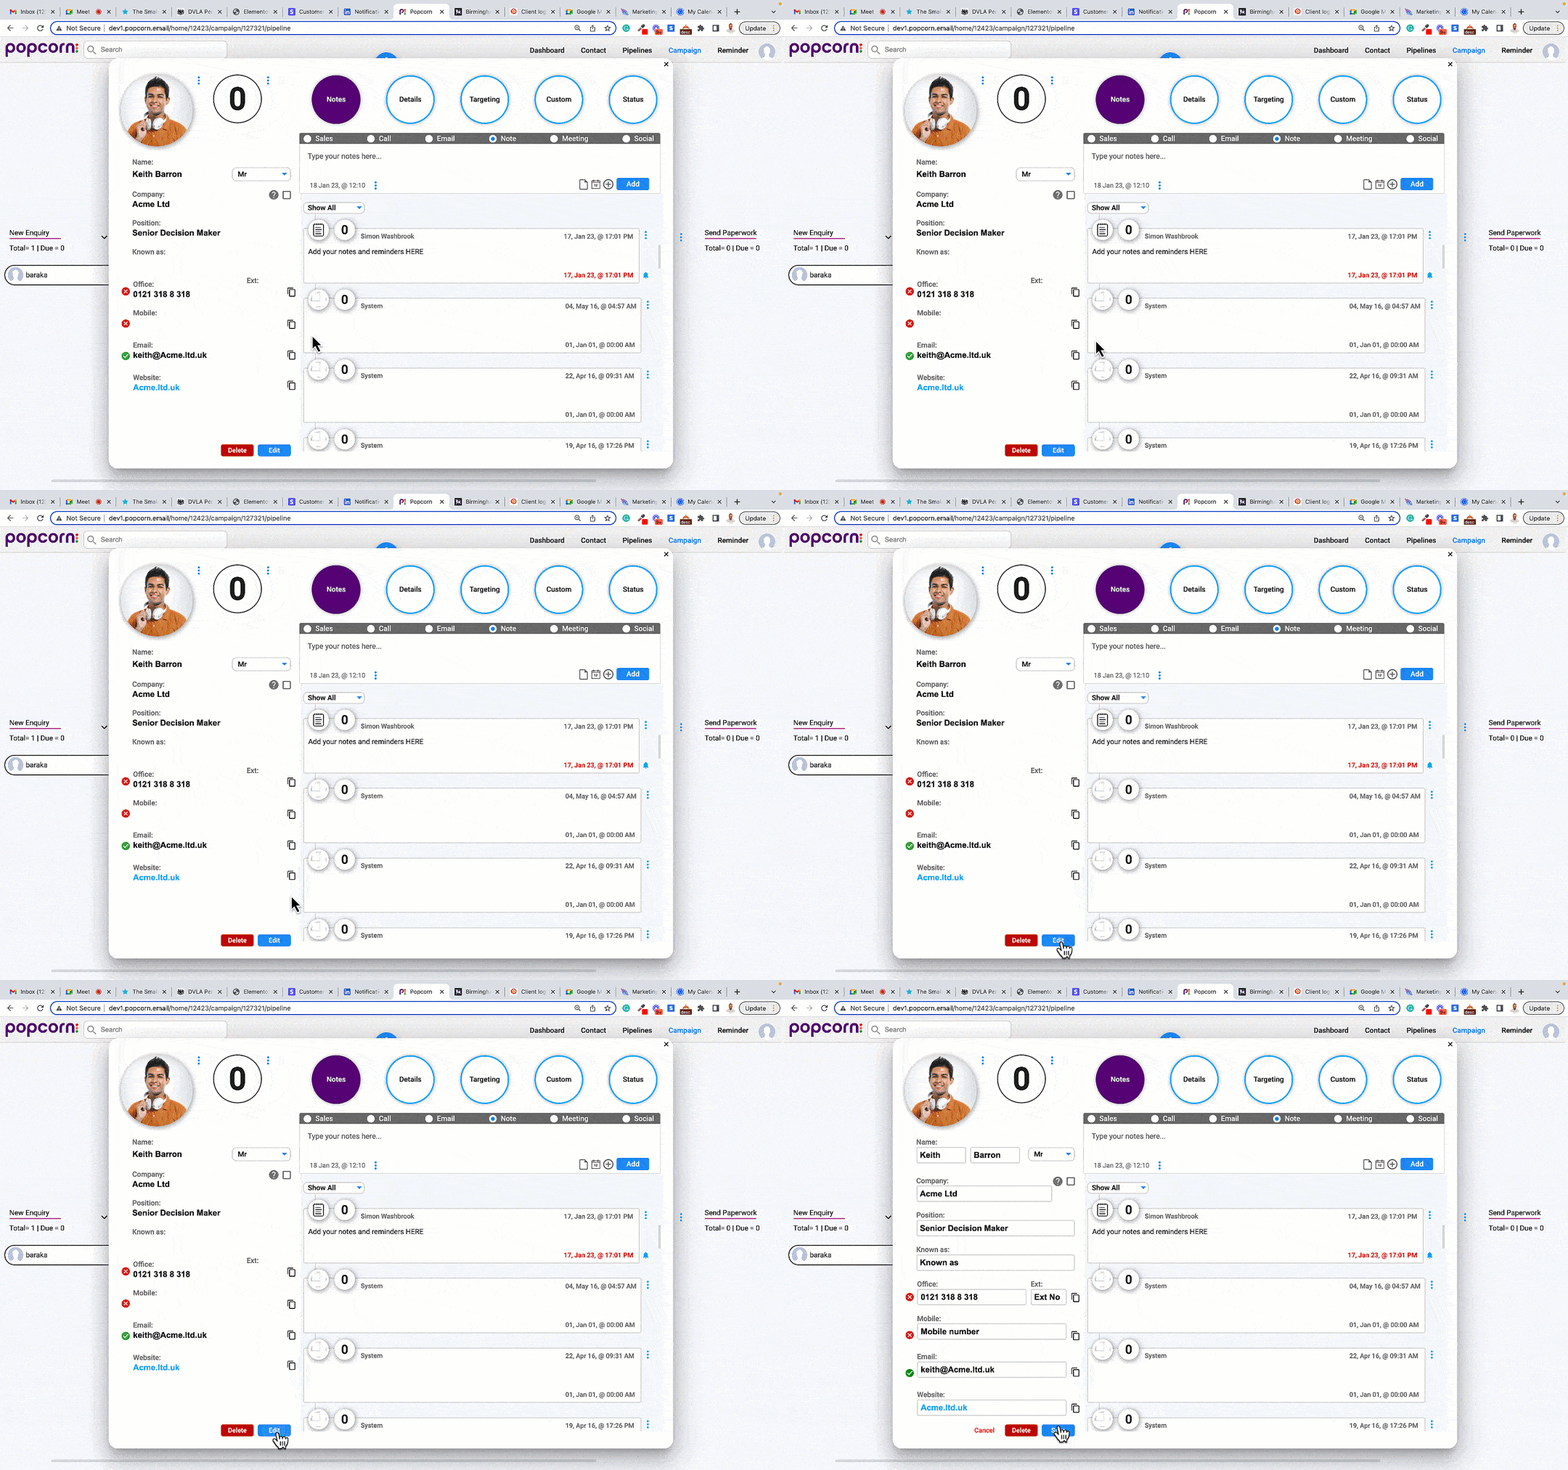
To edit the details in the ‘Contact Pop-up’ simply Click on the Edit button at the Bottom Left of the page. When you are finished and happy with your content, Click ‘Save’, if not Click ‘Cancel’, to forget all the changes.
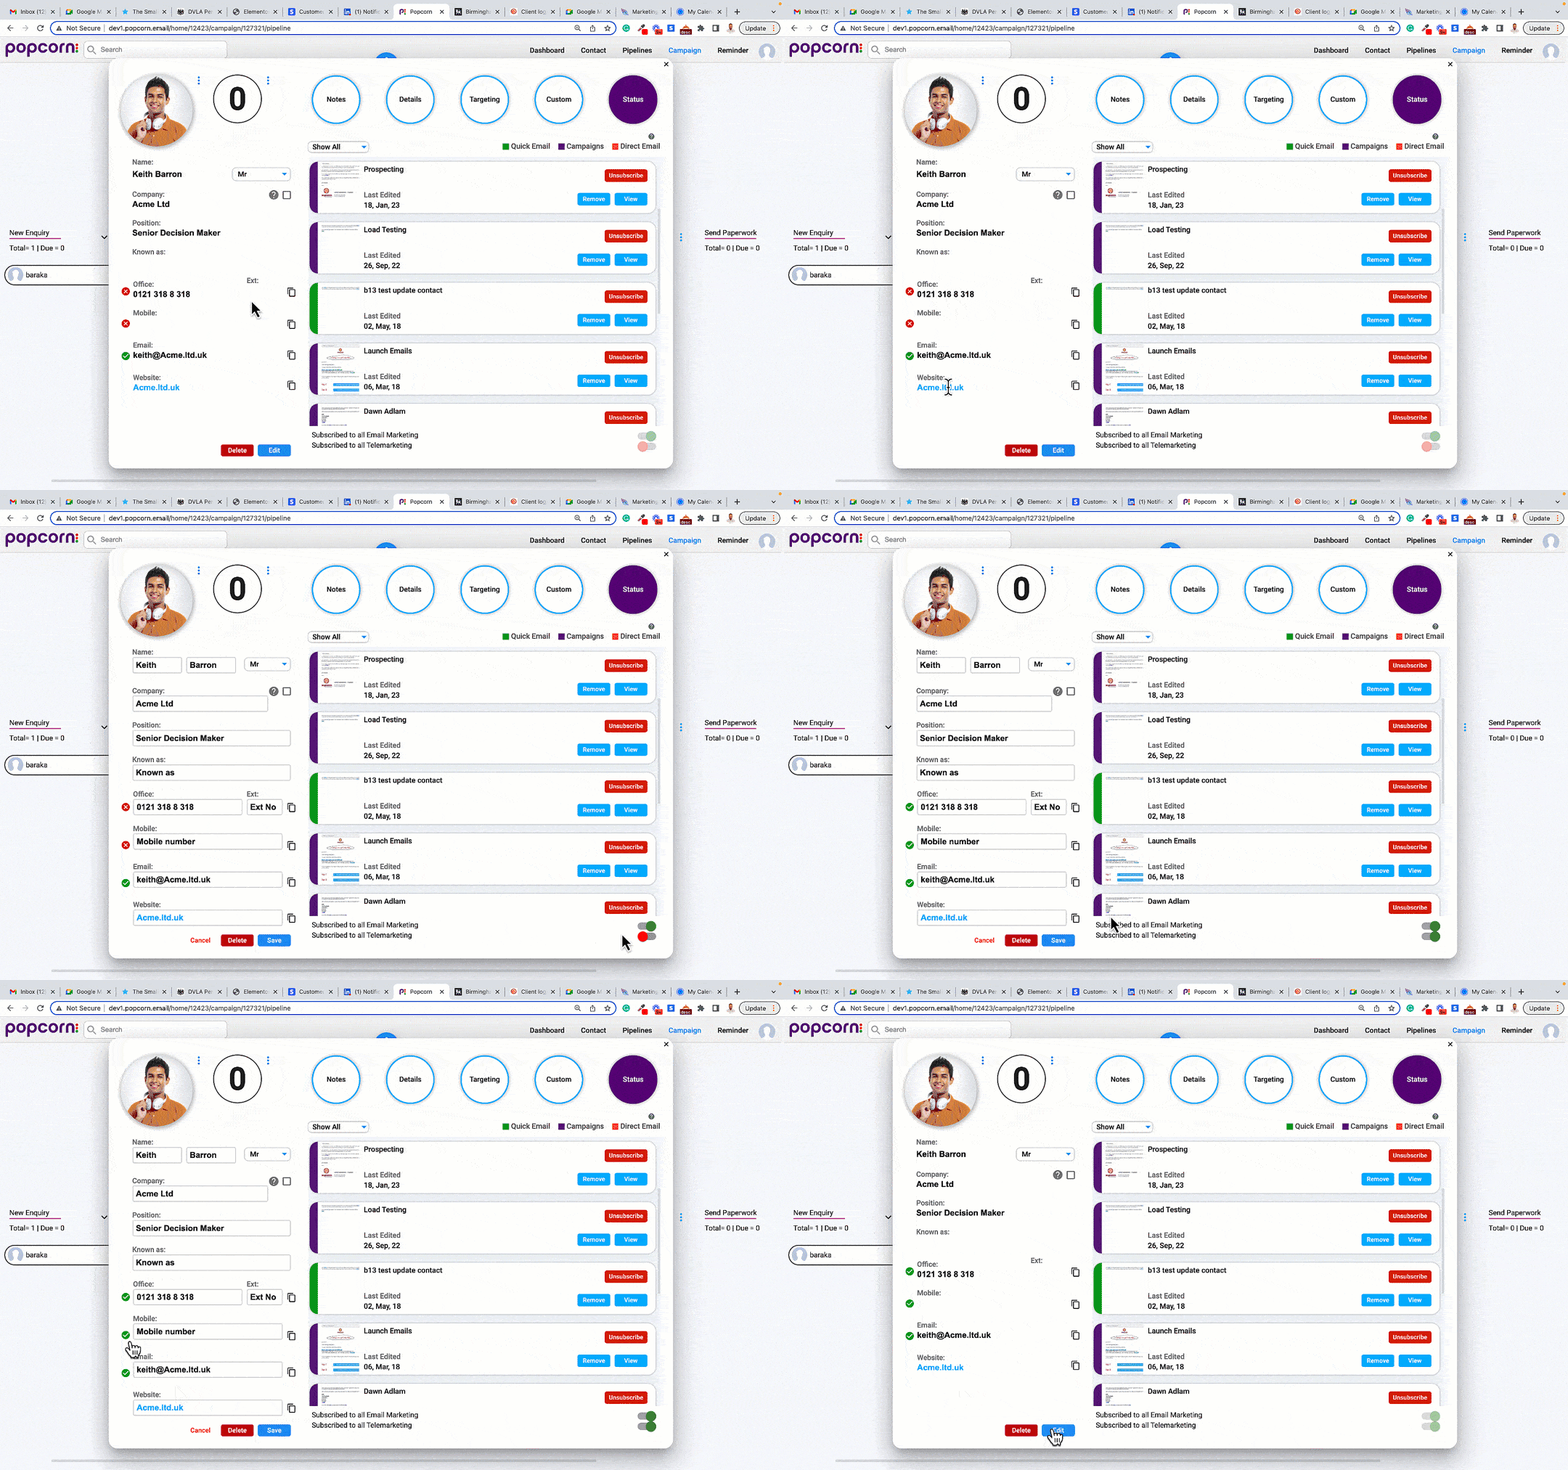
The circles to the left of the contacts Email and phone numbers, show their Marketing / GDPR preferences, so you know at a glance if they are happy to receive Marketing calls and Emails from your business.
To update these, simply Click on the “Status’ Tab at the top of the pop-up, Click Edit and then use the toggles to set preferences. These will then automatically update on the left of the page.
If a contact is unsubscribed from Email Marketing, it will prevent popcorn from sending them any Emails until the preferences are updated.
To change the name displayed in the pipelines from the individual’s name to a company name.
Simply Click on the contact’s name to pop-up their profile, Click ‘Edit’, Tick the box next to the company name and then Click ‘Save’.
Next time the pipeline page is refreshed, the company name will be displayed.
popcorn CRM uses the contact Email address for de-duplication, so this is needed for every contact you add to the CRM.
The company pop-up is due for delivery later in the year, and will allow you to see all contacts from the company, all their notes and manage shared details.
Notes Tab
The options across the top of the notes field allow you to define the type of note that you are taking (Sale, Call, Email, Note and Social).
When added to the timeline, these will add specific icons to the notes, allow you to filter the Timeline based upon the categories, and then update the statistics on the dashboard, i.e. the number of calls made in the month.

When a note is added to popcorn as a ‘Sale’, as well as the normal note-taking facility, you can also add a Sales value.
This value is then displayed in the contact pop-up timeline, with a specific Icon, and is added to the statistics on the Main Dashboard and campaign specific dashboards.
N.B. You can either use this for tracking closed sales or quote values.
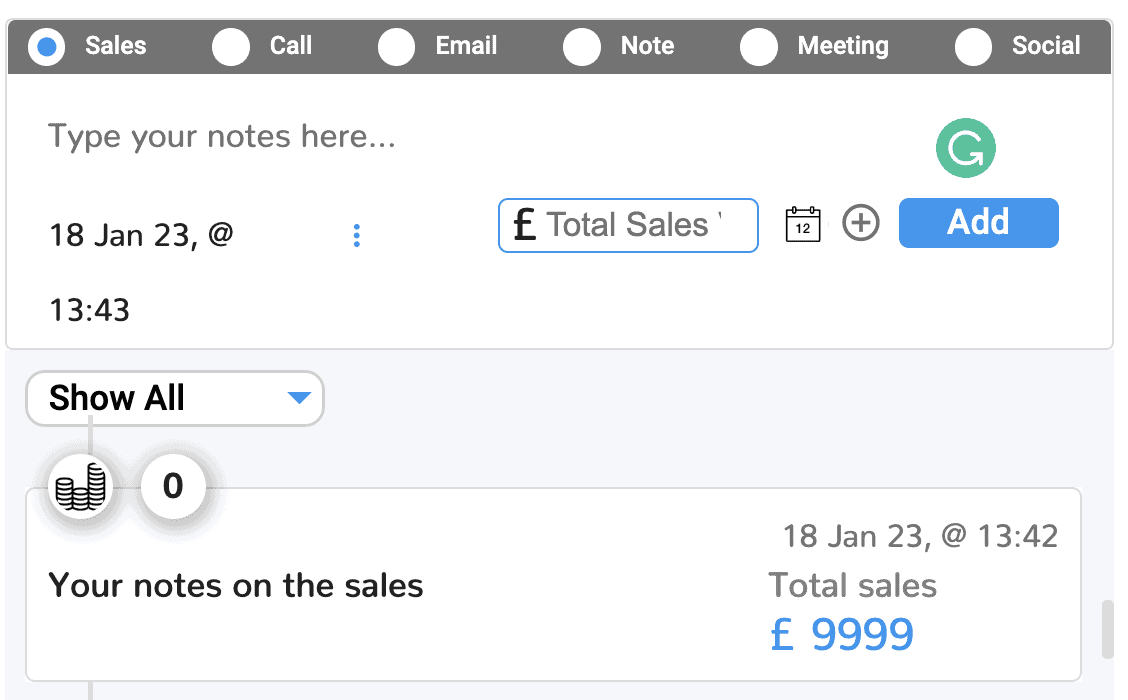
When a note is added to popcorn as a ‘Call’ note, it adds the note to the contact pop-up timeline, with a specific Icon, and is added to the statistics on the Main Dashboard and campaign specific dashboards.
An ‘Email’ note is the perfect place to copy the important Emails sent to and from your contacts.
The timeline is filterable on Emails, so it is a really easy way to ensure you can find information when you need it.
When an Email note is added to popcorn as ‘Email’ note, it adds the note to the contact pop-up timeline, with a specific Icon, and is added to the statistics on the Main Dashboard and campaign specific dashboards.
When a note is added to popcorn, it adds the details to the contact pop-up timeline, with a specific Icon.
The timeline is filterable on ‘Notes’, so it is a really easy way to ensure you can find information when you need it.
When a ‘Meeting’ note is added to popcorn, it adds the details to the contact pop-up timeline, with a specific Icon.
The timeline is filterable on ‘Notes’, so it is a really easy way to ensure you can find information when you need it.
When a ‘Social’ note is added to popcorn, it adds the details to the contact pop-up timeline, with a specific Icon.
The timeline is filterable on ‘Notes’, so it is a really easy way to ensure you can find information when you need it.
When you are either editing/creating a new Note, you can easily adjust the creation date. This will adjust its position in the timeline and change the date shown in the bottom left hand corner.
To adjust the date, edit the existing post, by clicking on the 3 dots to the right of the post in the timeline.
There are 2 ways to add a ‘Reminder’ to a contact:
- Open the ‘Contact Pop-up’, type your note into the notes field, then Click the Calendar Symbol next to the ‘Add’ button. once you have selected the date click Save.
- Click on the ‘+’ menu, Click ‘Call’, then search for the contact you want to add reminder to, then add your notes and select a reminder date. If you want to connect this to a specific campaign, select it from the dropdown list and then save. This will then be added to the contacts timeline.
To add a file to a contact’s notes:
Open the ‘Contact Pop-up’, type your note into the notes field, then click the File Symbol next to the ‘Add’ button. Once you have selected the file you want to upload Click ‘Save’.
Once uploaded the file will appear as a link inside the note.
N.B. file types that can be uploaded are text files (.txt), .pdf, .png, .jpeg, .csv, and .docx

To manually update the score of a contact.
Open the ‘Contact Pop-up’, type your note/explanation for adding the score into the notes field, then click the ‘+’ Symbol next to the ‘Add’ button and then once you have selected the score you want to add, Click ‘Save’.
Once uploaded, you will see the score update on the left-hand side of the saved note and the score will increase at the top of the popup.

The icons next to the ‘Add’ note button are:
– Add a file to the note
– Set a reminder for the note
– Manually apply a score to a Note

The Name of the User who created the note is displayed in the top left-hand corner of the note once it has been ‘Added’.
The reminders are displayed in three places:
- In the contacts timeline – when a note is saved to the timeline, the reminder will appear in the bottom right-hand corner of the note.
- If the note has been associated with a specific campaign, it will then appear in the campaign dashboard’s reminder section.
- Finally, if you want to see all reminders which have been set in your system, click on the reminders tab in the top right of the page.
Rescheduling a reminder can be done very quickly, in 3 different ways:
- In the content pop-up, simply Click on the bell icon next to the saved note with a reminder, this will then pop up a window for you to select a new date.
- When in the campaign dashboards reminders section, Click on the 3 dots next to specific reminder, and then Click ‘reschedule’.
- In the main reminders section, Click on the calendar icon next to the reminder you want to reschedule.
To edit a ‘Note’ in the contact pop-up, simply Click on the 3 dots next to the saved note in the timeline and select ‘Edit’. The original notes will then appear in the editor box.

To delete a ‘Note’ in the contact pop-up, simply Click on the 3 dots next to the saved note in the timeline, select ‘Delete’. A confirmation box will then appear and you will be able to delete the note.

Details Tab
We do not limit the number of contacts that you can store in popcorn…
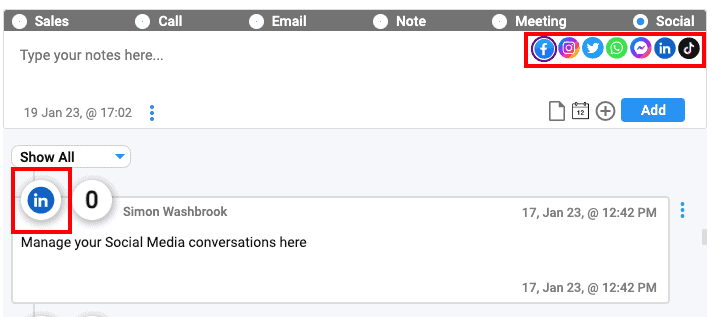
No CRM can connect to social media to sync contacts, although popcorn allows you to copy and paste your conversations in to the pop-up timeline, and then tag them with the appropriate social media accounts. This allows you to easily filter and identify where your conversations are coming from.
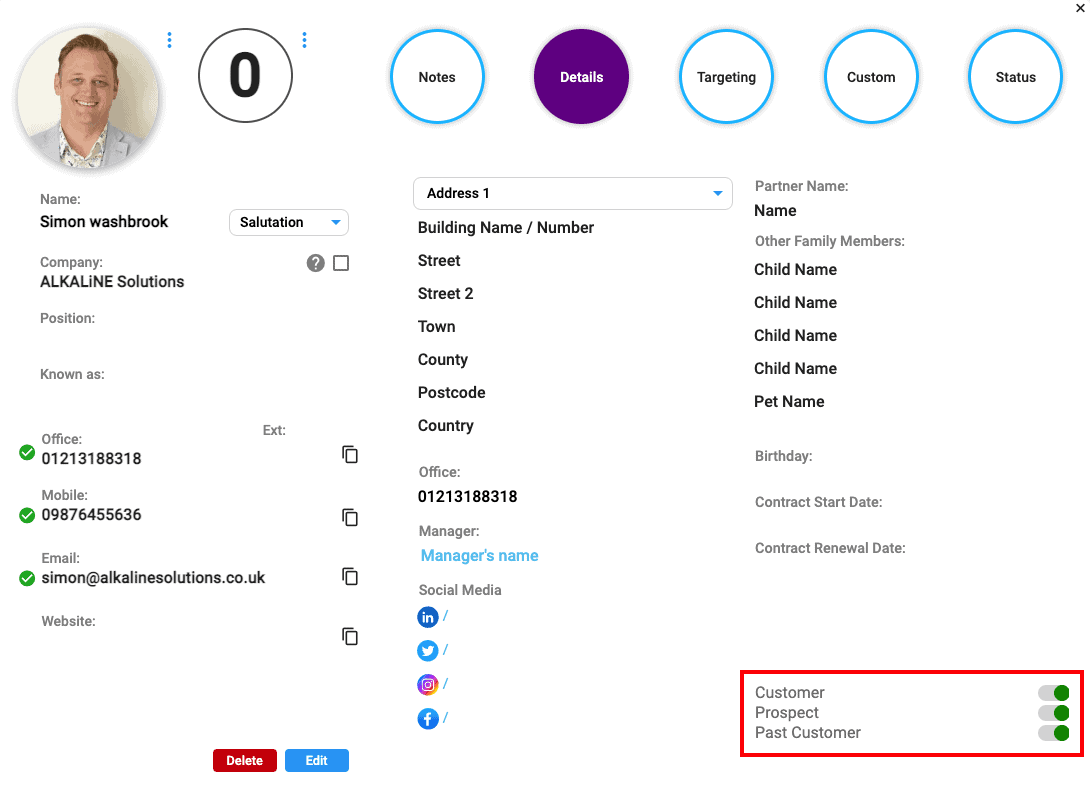
The Toggles allow you to quickly identify the appropriate status of each contact. They will also work with the Filters, so in one click you can filter all your customers and target them.
Targeting Tab
Tags can be applied to any of your contacts and give you the ability to have a quick overview of that specific contact. They also allow you quickly to segment and target your data, using the filters (these can be found at the top of any contact list).
You can add as many Tags to a contact as needed. Once you have added a Tag, the system will remember it and offer if in the ‘Recent’ tags section (for the next contact that is not using it) or it will appear as an option when you start typing in the search box.
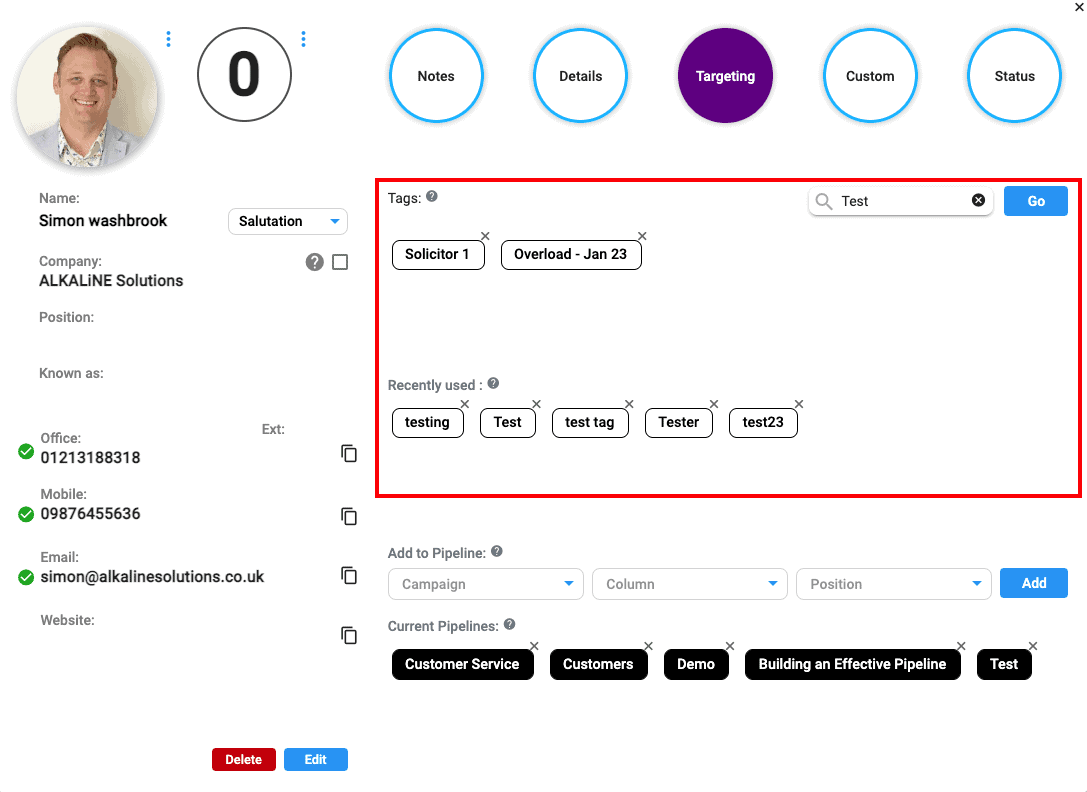
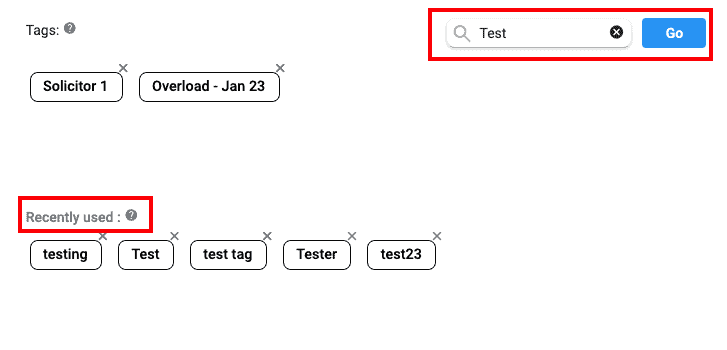
To add a Tag, simply start typing the name into the ‘Add or Search’ Bar. If the Tag is already in the system, it will appear in the ‘Recently Used’ section, where you can then click on it to add it. Or, if it is not in the system, click the ‘Go’ button to add it.
To remove a Tag from a contact, simply click the ‘X’ above the specific tag in the ‘tags’ section.
We do not limit the number of Tags you can add to a contact or add into the system.
The ‘Recently Used’ Tags show the Tags that have not been applied to that specific contact.
To apply one of these ‘Recently Used’ Tags, simply Click on the Tag you want to apply, and it will be added to that contact.
Description to follow shortly
Sales pipelines give you the ability to recreate your sales process in a highly visual and customisable way.
You can find them both on the Dashboard, inside Campaigns and under the Pipelines tab at the top of the page.

To add a contact to a Pipeline via the Contact pop-up, simply select the Pipeline, column and position you want to add them to, then Click ‘Add’. You will then see that specific pipeline appear in the Current Pipeline section.
To Remove a contact from the Pipeline, simply click on the ‘x’ above the Pipeline you want to remove in ‘Current Pipelines’ and it will be removed.

Custom Tab
Custom Fields allow you to record information that is specific to your business and it not already recorded in popcorn.
Click the ‘Edit’ button to re-name a Custom Field, it will then change the Field name across all contacts. Each Text Field is then contact specific.
Custom Fields can be applied to your Email Marketing via the ‘Personalisation’ button in the Email Editor or by simply typing the ‘@’ symbol and selecting the personalisation field you need.
Status Tab
This is where you can easily manage all your contacts GDPR preferences.
We list all the Emails and Campaigns that the specific contact is connected to. You can then choose to unsubscribe or remove them from the specific campaigns.
There is also the option to display a contacts preferences next to their Phone numbers and Email address. Simply toggle the option you want to change. If you unsubscribe them from Email Marketing, it will prevent them from receiving any Emails.
A Direct Email is created when you Click on the person’s Email address in the contact pop-up. This creates an Email that is sent to only that individual. These Emails are only displayed in this Status section as it is personal to that contact.
A Campaign is used for targeting and nurturing specific groups of contacts over a longer period of time.
You can use the Filtering tools to either identify specific segments or all contacts in popcorn, you can then target them with Email Marketing, nurture them along customised pipelines or set-up Automations.
A Quick Email, allows you to send a one off Email to either a targeted group of your contacts or to everyone. It will give you all the usual Email Marketing statistics and tools, but everything is managed on one page for speed and simplicity.
These Emails are very much designed for singular communications. If you are planning to send multiple Emails, wanting to manage them along a Pipeline or apply automation, it would be best to set up a Campaign.
These Toggles allow you to set the individual contact’s subscription preferences and allow you to display them next to their Phone numbers and Email address. Simply toggle the option you want to change. If you unsubscribe them from Email Marketing, it will prevent them from receiving any Emails.
Statistics
The ‘Statistics’ box gives you an instant report of all the activity that you have completed over defined periods of time.
The statistics in these boxes are generated in 2 ways:
Contact Popup – when you or your additional users enter details into the contact popup, the summary information is displayed here.
The following sections are populated this way:
Meetings, Sales Values, Calls, # of Sales and Average Sale.
System generated – popcorn will automatically track and score the following activities, many of these scores can be adjusted via the ACCOUNT>SETTINGS page.
Hot Prospects, Email Sent, Bounces (Hard and Soft)
A hot prospect is automatically generated in Popcorn when a contact achieves a defined score.
When an email is sent from Popcorn, a unique fingerprint is captured and all activity around email marketing (opens and clicks) and their subsequent visits to your website (tracking code needs to be installed) on the day and up to 3 months after the last open, are all tracked and scored. The individual scores for activities and the parameters for Hot, Warm, and Cool prospects can all be adjusted via ACCOUNT>SETTINGS>SCORING
You can also manually add the score to a prospect by clicking on the plus icon in the contact pop-up and then saving a note.
The ‘Sales Value’ is measured by adding together all of the sales values during the defined period of time.
The figure displayed in the main dashboard covers all sales across the account and the figure displayed on the campaign dashboard is specific to that campaign.
The number of sales is generated by adding up the total number of sales (not sales value) added during the defined period of time.
The figure shown on the main dashboard is the total value across all campaigns. When you drill into a campaign, the figure displayed on the dashboard is specifically for sales that are connected to that specific campaign.
And average sales value is calculated by dividing the total sales value by the total number of sales.
Again, the main dashboard provides you with an overview across your whole account, and campaigns provide you with campaign specific information.
Meeting notes added for the contact pop-up are recorded in the statistics as individual meetings.
To add a meeting: open a contact pop-up, add your meeting notes, then select a meeting from across the top of the pop-up and save.
Calls can be recored in 2 ways:
The first is via the contact pop-up, by adding a note as normal but changing the type at the top to be a ‘Call’.
The second way is via the ‘+’ menu: Simply click on ‘Call’, and search for the contact you would like to register it to. Their contact details will populate, you can then add your notes and reminder dates. Once saved, this will be added to the specific contact’s timeline and is recorded in the statistics as an individual call.
As with all statistics, the figure shown on the main dashboard is the total value across all campaigns. When you drill into a campaign, the figure displayed on the dashboard is for sales that are connected to that specific campaign.
This figure is tracked when an email is sent out via the email marketing platform (built into Popcorn). All sends are recorded here.
The first figure displayed is the total number of emails sent. The second figure is the allowance on your account. If more emails are needed, you can upgrade via ACCOUNT>PACKAGE
When sending emails via Popcorn’s email marketing platform, we will identify any emails that bounce, and display them here.
A bounce is an unsuccessful email delivery. There are two types of bounces:
A ‘Soft Bounce’ occurs when a delivery has failed i.e. the recipient’s inbox is full:
A ‘Hard Bounce’ occurs when there is a permanent delivery issue with the recipient’s mailbox i.e. it no longer exists, or when an email has soft bounced three times consecutively.
To change the time frame of the statistics: select the drop-down box in the top right-hand corner of the box, it will then display the relevant statistics for that period of time.
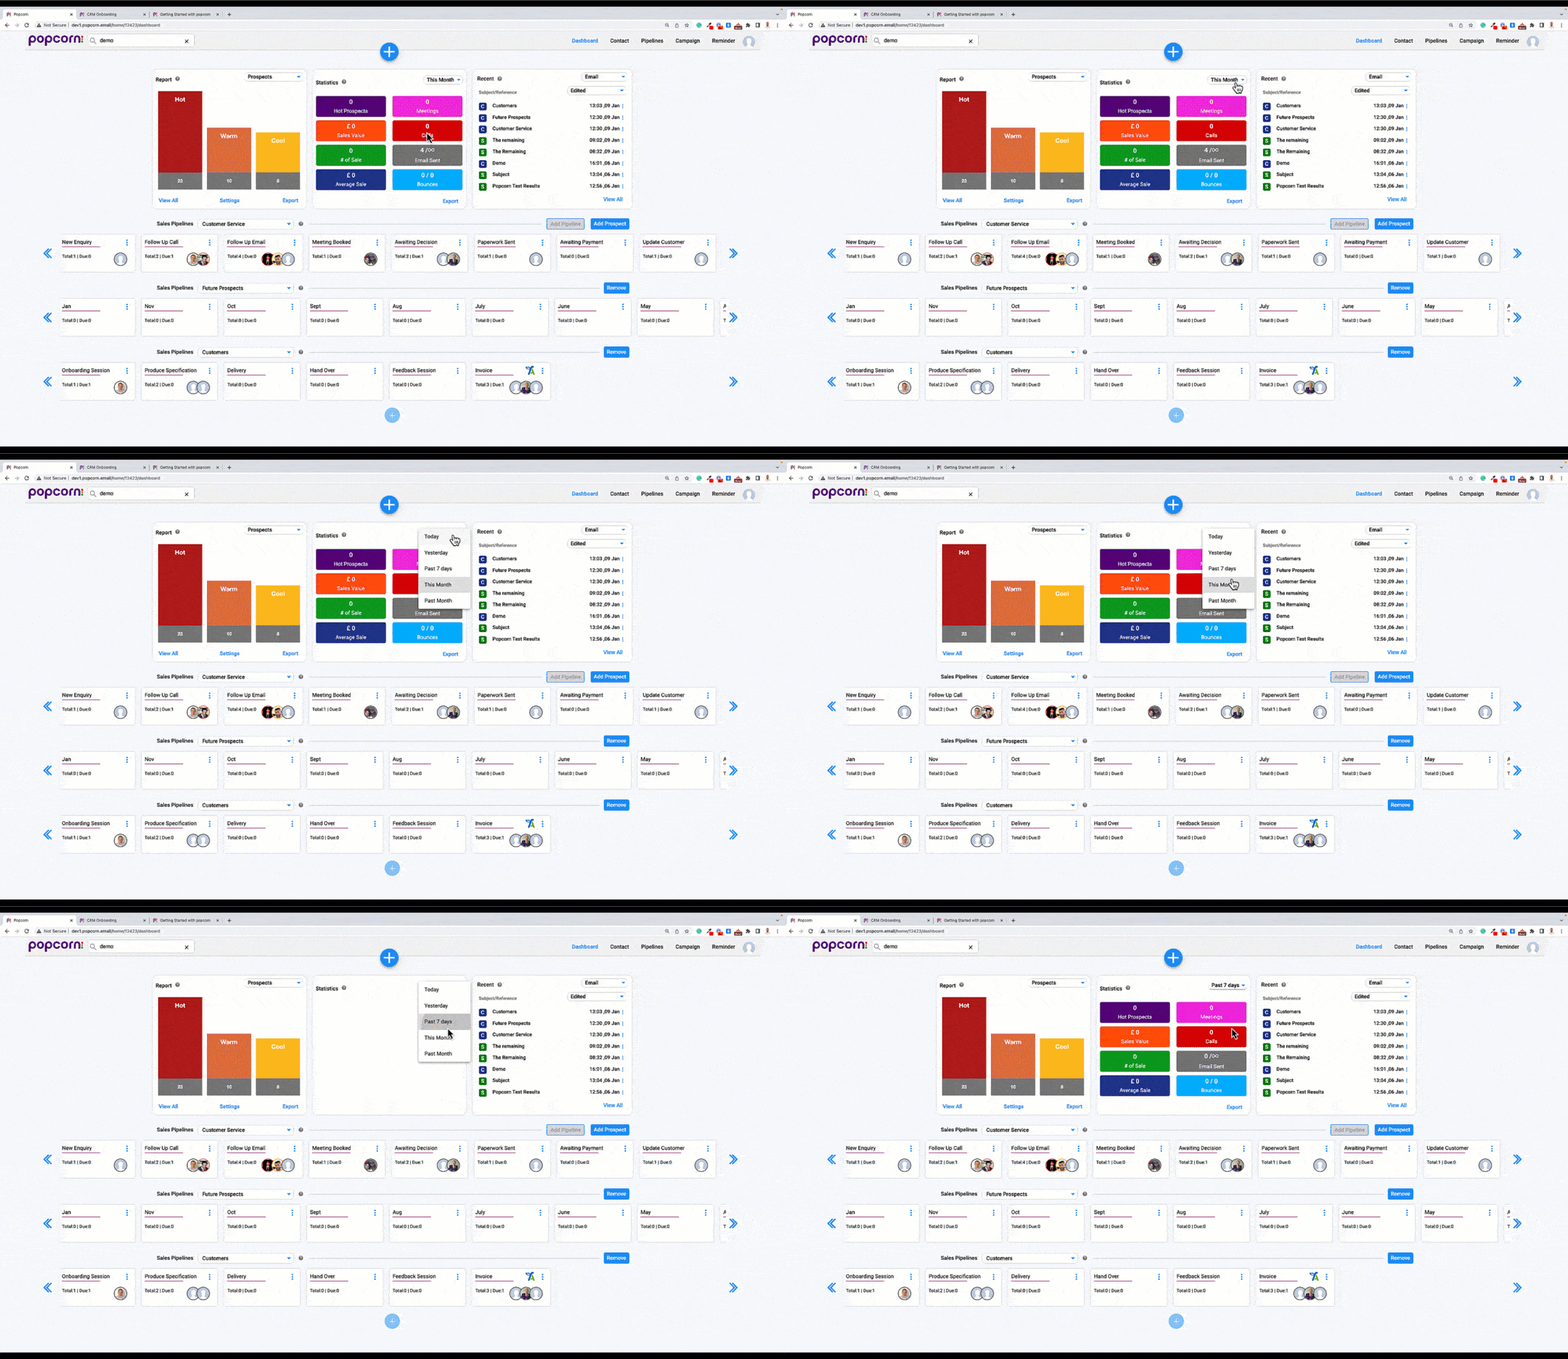
This is not currently available. However, we are aware that our users would like this function and it will be in development in the near future.
Reminders
Reminders, ensure that you never forget an opportunity or sales follow up, again.
Add reminders to your notes to get an email notification. You can also view your reminders all at once, as either a clean and visual list, or as daily/ weekly/ongoing activity.
To add a reminder, either:
- Click on a contact’s name
- Add your note/reminder
- On the alarm clock icon (next to the Add button)– click on the icon to add a reminder time and date
- Once set, add your note. The reminder details at the bottom right corner of the note will appear.
OR
- Click on the ‘+‘ menu
- Click ‘Call‘
- You can then Add a note and reminder at the bottom. Remember to change the note type at the bottom.
There are 4 ways to view a reminder in popcorn:
- Dashboard – Click on dropdown in the ‘Recents‘, to view reminders from across all users and campaigns
- Contact Popup – A reminder is shown in red at the bottom right of the boxes in the Notes timeline.
- Reminders Tab – Across the top of the page, click here to view a full page view of reminders from across all users and campaigns.
- Campaign Dashboard – View Reminders that have been added to a specific campaign.
PLEASE NOTE – A reminder displayed in RED font means that it is past due.
How to mark a reminder as complete:
- If you are in a list of reminders or in the contact popup – Click on the 3 blue dots to the right of the reminder, then select ‘Complete.’
PLEASE NOTE: Completing /Deleting a reminder only deletes the reminder, not the actual note.
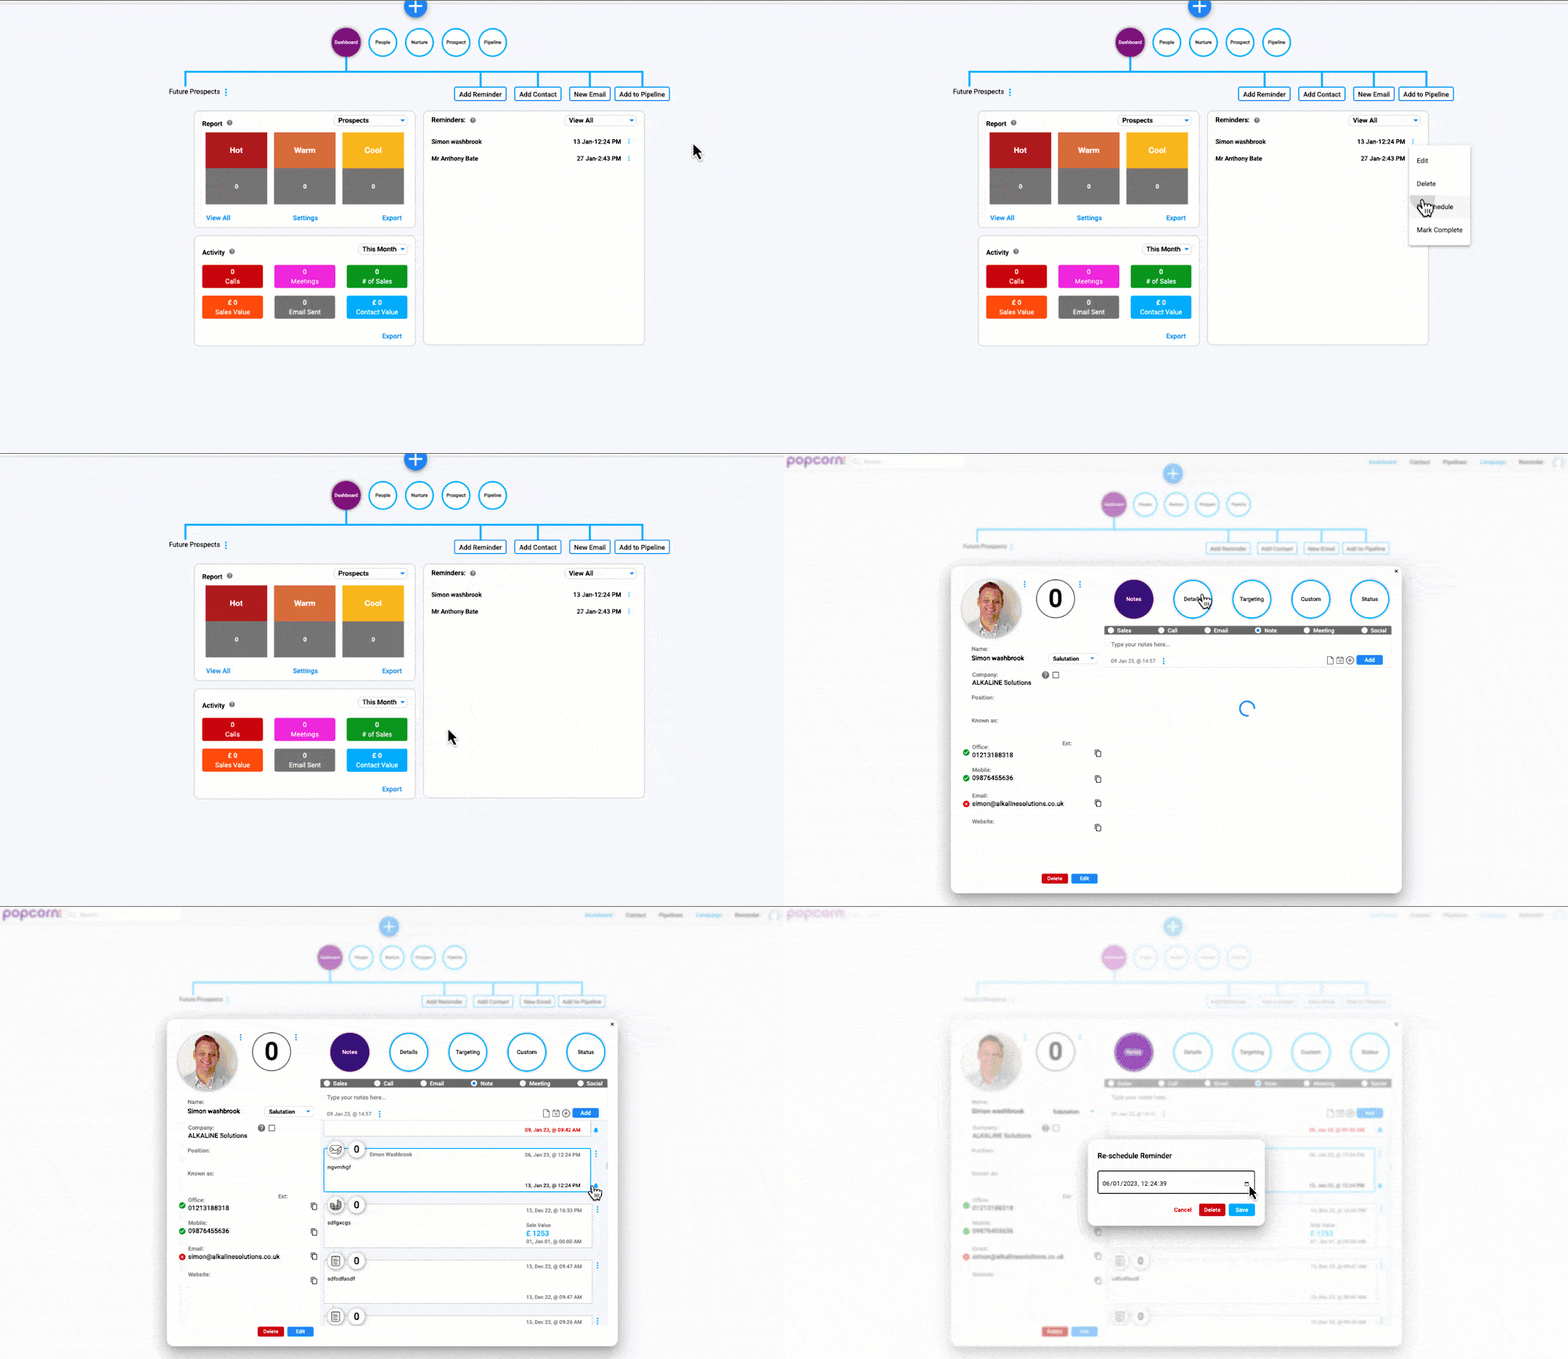
To reschedule reminder:
- If you are in a list of reminders; Click on the 3 blue dots to the right of the reminder, and select ‘Reschedule‘.
- If you are in the contact popup, Click on the Bell icon next to the note you want to reschedule
- A popup will appear and allows you to select a new time and date.
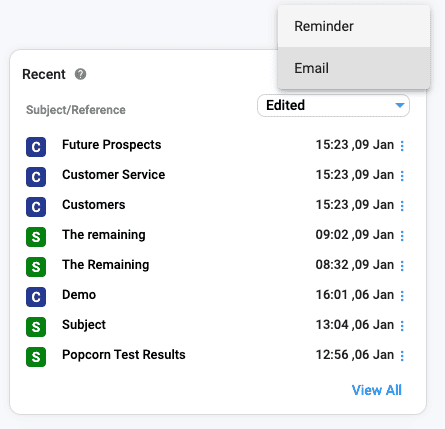
To view all the reminders on the dashboard: Click on the Drop down in the ‘Recents‘ tab, select ‘Reminders’. This will display reminders across the entire system for the selected period of time.
Currently, the only way to assign a reminder to a specific user is to create a campaign folder for that user.
Once a reminder has been created from inside of that campaign or created as a general reminder, you can assign a reminder to a specific campaign.
When the reminders are then viewed from the campaign dashboard, it will only show the relevant reminders.
General
A ‘Campaign’ is a place where you can target and nurture groups of contacts around specific messaging. Email Marketing is one of the Tools within the nurturing section.
When you send a ‘Campaign’ email, it will be sent to everyone in the ‘People’ section. You won’t need to keep selecting the contacts, they are always there.
You can create new Campaign in 2 ways:
‘+’ menu – click on the ‘+’ icon at the top of the page and select ‘Campaign’
Or
Campaign Page – at the top right of the pages, click on ‘Campaign’, then click the ‘New Campaign’ button at the top of the list.
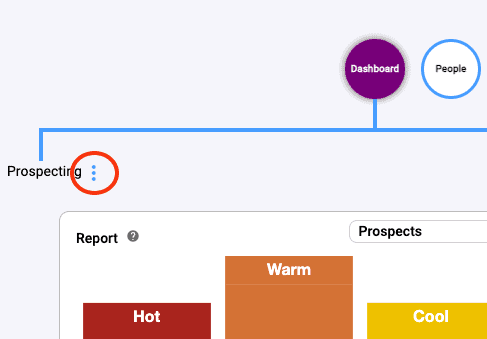
Click into the Campaign you wish to rename, then click on the 3 dots next to the Campaign name. A popup box will appear then you can change and save the new name.
The Campaign Page at the top right of all the pages will give you access to all your Campaigns and Single Emails.
This is the first campaign that is set up on your account.
As Default, when you add a contact to popcorn, they will automatically be added to this Campaign. You can change the Default campaign at any time, by going to the CAMPAIGN page, clicking on the 3 Dots to the right of the campaign, then clicking ‘Set as Default’. This sets the campaign as Default, is highlighted and can always be found at the top of the campaign list.

Dashboard Tab
The Campaign ‘Dashboard’ gives you an overview of everything you need to know about that specific campaign, in one place including:
‘Reports’ – quick access to campaign-specific versions of the reports from the Main Dashboard.
‘Reminders’ – All reminders that are connected to that specific campaign folder over a defined period of time.
‘Activity’ – add up to 3 pipelines to the dashboard for an overview of all the activity.
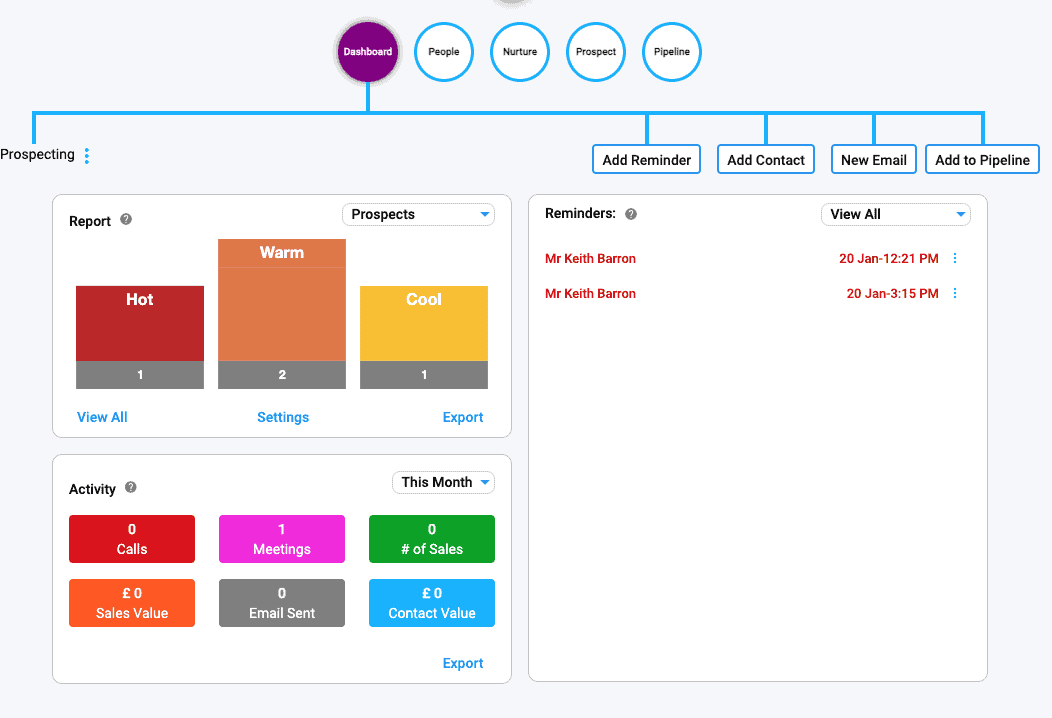
The ‘Reports’ box on the Dashboard gives you quick access to the following reports that are specific to the campaign you are currently in:
Hot, Warm and Cool Prospects: These are generated automatically by tracking and scoring your contact’s activities over Email Marketing Opens, Clicks, Website Visits and Return Visits to specific pages.
‘Prospect’ scores are averaged out over the last 3 emails a contact has received, so you will see contacts move around the ‘Hot’, ‘Warm’ and ‘Cool’ scales.
Website Tracking – If you are signed up to the ‘Prospecting’ package, once a contact opens an email sent from popcorn, it automatically tracks the specific pages a contact has visited on your website up to 3 months after their last email opened.
Recent Email Marketing Activity – An overview of the last 7 days of Email Marketing activity by your clients.
All the above reports are fully clickable, to give you details of specific users.

The ‘Statistics’ box provides an overview of all the activity that you have done over a set period of time (this can be changed via the drop-down in the top right) which includes:
Sales Value – The total value of sales you have reported in contact ‘Sales’ notes.
Calls – The total number of calls you have reported in the contact popup’s ‘Call’.
Meetings – The total number of meetings you have reported in the contact popup’s ‘Meeting’ Notes
# of Sales – The total number of sales that you have reported in contact ‘Sales’ Notes.
Emails Sent – This shows the number of emails you have sent and how many there are left from your allowance.
Average Sale – The average sales value of a sale that you have reported in contact ‘Sales’ notes. This is calculated by dividing the ‘Total Number of Sales’ by the ‘Number of Sales’
The ‘Export’ button allows you to export the top level statistics into a CSV file.
When you add a reminder you can opt to connect it to a specific campaign.
A reminder will appear in the General list of reminders in the Dashboard. On the ‘Reminders’ page, you can then view specific reminders via the Campaign Dashboards. These are all managed and can be viewed via the contact popup.
Currently, the only way to assign a reminder to a specific user is to create a campaign folder for that user.
Once you create a reminder within that campaign or create a general reminder, you can assign it to that specific campaign.
When the reminders are viewed from the Campaign Dashboard, it will only show the relevant reminders.
Marking a reminder as ‘complete’ leaves the reminder date in place (for your knowledge) but it is removed from all reminders list.
To do this, click on the 3 blue dots beside the reminder in the Dashboard views or on the Reminders page. Select the reminder you wish to complete, click the actions button and mark as complete.
People Tab
This section of the campaign allows you to view and manage the contacts that are associated with a specific campaign.
Any contacts added to this will receive email marketing when it s sent from that folder. They will also be flagged up as campaign-specific prospects in the campaign-specific dashboard.
To add a contact to a campaign folder, click on the ‘People’ tab of the campaign you want them added to, then click on the ‘Add Contacts’ button.
A pop-up window will appear with all the contacts available. You can choose to add all by clicking on ‘Select All’, or use filters to target specific contacts. Once you have selected contacts to add, Click on ‘Add’. When the pop-up closes, the number of contacts added to the campaign will increase.
To remove a contact, follow the same process as above, but de-select the contacts you want to remove and update the list.

The ‘Action’ button is located at the top left-hand side of any list of contacts. This button allows you to apply the following actions to all or a targeted group of contacts that you have manually or used filters to select.
The Actions you can apply to your selected contacts are:
- Add/remove from a Pipeline
- Add/remove from Tags
- Add/remove from a Campaign
- Delete
- Send a ‘Quick Email’
- Export
- Unsubscribe

The ‘Filter’ button is located at the top left-hand side of any list of contacts. This button allows you to filter/segment your contacts based on one or multiple factors.
There are 3 steps to adding a filter:
- Select if you want to ‘Include’ or ‘Exclude’ the filters from the results you are generating – e.g. you can opt to exclude all contacts with a specific tag.
- Select the Filters you want to include.
- Select how you want the filter to work – i.e. ‘All Filters’ (And) means that every single contact filtered must include all of the filters you have selected. Or if you have selected ‘Any Filters’ (Or), this will display the results for contacts that have at least one of the filters you have added. For those Techies reading this, it is the same as an “And’/’Or’ function.
You can click the ‘Add’ button to add as many or as few filters, which will allow you to target specific groups of contacts.
The “Filters’ which are available:
- Hot, Warm or Cool Prospects
- Customers
- Prospects
- Email marketing Opens
- Email marketing Non-Opens
- Email Marketing Clicks
- Email marketing Non-Clicks
- Already Included in an Existing Quick Email
- Already Included in an Existing Campaign
- Unsubscribed Contacts
- Visits to a specific page on your Website
- General Website visits
- Contacts in a specific Pipeline
- Contacts with a specific ‘Tag’
- The Date the contacts were added to popcorn CRM
- Contacts with a task due to them
- Contacts you have marked as ‘Called’
- Contacts that have had Activity recorded against them in the last 30 Days
- Contacts that have had Activity recorded against them in popcorn CRM
- Users (system admin only)
Nurture Tab
The ‘Nurturing’ tools are available to users who have signed up for the ‘Prospecting’ package or above. If you are a Prospecting User, please visit of ‘Prospecting Onboarding Guide’ or you can find out more on the pricing page.
The Nurture section of a campaign is where you can proactively nurture your prospects.
We will be launching a Forms Editor later in the year, allowing you to build customised forms that will update into your CRM – Watch this space.
Prospecting
The lead nurturing side of popcorn expands upon the CRM package, giving you the ability to track and automate prospect engagement, identify the hot prospects and nurture them through your sales process.
Users signed up to the ‘Prospecting’ package will have access to the Automated Prospecting that is built into popcorn.
These Prospects are automatically graded as ‘Hot’, ‘Warm or ‘Cool’ based on their online activities, allowing you to target your prospects with intelligence.
In Step 2 of the CRM Onboarding page, we talk you through a simple 6 step process to help you build a simple pipeline that you and your team will love using.
The entire process should take you no more than 8 mins to watch.
This FREE Training course is built on the back of a series of half-day workshops that popcorn has been running for the past 4 years.
We have developed a proven 10-step training course that will show you how to use email marketing to identify new leads, qualify prospects and use a CRM to manage them through your sales process.
This course is designed to help you to develop an amazing email strategy and build a robust sales pipeline so that your business is ready for growth.
Click below to find out about the course content:
Take me to the Training – Click HERE
Personalising the number of ‘Hot’, ‘Warm’ and ‘Cool’ prospects that appear in popcorn can be done by going to Accounts > Scoring.
Here, you can adjust the default scores for specific activities (including tracking specific pages on your website) and the ranges for ‘Hot’, ‘Warm’ and ‘Cool’ clarifications.
Personalising these will help you generate more or less prospects.
- popcorn enables greater visibility of all the actions you have applied in the CRM by connecting the essential parts of software that a small business uses. You can segment your data and organise your contacts based on tags and also on engagement across email marketing, website, tasks, etc.
To filter your contacts: Click on the ‘Filter’ tab that appears at the top of every list of contacts inside popcorn.
You can select any one of the below or a combination to narrow down your result further:
- Prospects: Hot, Warm, Cool
- Subscription Status
- Activity Dates
- Email Opens/Not Opens
- Email Clicks/No Clicks
- Specific Webpage Visits
- Task Due
- Recent CRM Activity
- Dates Added to the System
- Campaign Activity
- Tags Included/Excluded
- ‘AND/ANY’ Filters – chosen Filters will apply e.g. if you added a Tag for ‘Birmingham’ and ‘Designer’, the contacts displayed will have both tags on them.
- ‘OR/ANY ‘Filters – chosen filters will apply e.g. if you added a Tag for ‘Birmingham’ and ‘Designer’, the contacts displayed will have either or both applied to them.
- ‘AND’/’All FILTERS’ – all the applied Filters, will apply e.g., if you added a Tag of ‘Birmingham’ and ‘Designer’, the contacts displayed must have both tags on them
- ‘OR’/’ANY FILTERS’ – any selected Filters will be applied e.g. if you added a Tag of ‘Birmingham’ and ‘Designer’, the contacts displayed will have either or both applied to them.
One of the key features of popcorn is Lead Generation. It is automated by tracking your contacts’ engagement across email marketing, website activity, and prospect scoring. The scoring can be personalised via ‘Account Settings’ which allows you to generate specific prospects tailored to your business.
The prospects are automatically separated into Hot, Warm, and Cool prospects.
To quickly identify these prospects, click on ‘Quick Reports’ in the dashboard. Here, popcorn can break down the information for you further. You can view individual contacts this way and their score is shown on the contact’s profile in a circle at the top left-hand corner of the popup.
When you add a new prospect pipeline to your sales pipeline, your prospects will be added automatically. Contacts in this pipeline will have a coloured key line around the tab which enables identifying the level of prospect.
When popcorn automatically identifies a prospect, it will flag them up in 2 ways:
- By adding them to the ‘Prospecting’ section of the ‘Dashboard’ and ‘Campaign’ folders.
- The lozenge colour will change in the ‘Pipelines’ from Grey to Red, Orange or Yellow.
This helps you to identify which prospect to follow up on first.
popcorn tracks your contact’s interactions with your email marketing and website. It monitors every page clicked on for up to 3 months after an email is opened.
We do this with confidence as we create a unique ‘fingerprint’ (based on IP address and MAC address). When your contact’s fingerprint appears on your website, popcorn generates this information in a history list to help you keep informed.
As you move your contacts along your sales pipeline, you will find that some move faster than others.
But this is where you can use popcorn’s built-in nurturing tools to speed up the process.
Using the automated Lead Generation, Segmenting and Filtering tools, popcorn can help you identify contacts who are engaging around specific subjects. With this, you can get busy securing those prospects!
Popcorn’s built-in email marketing tools will enable you to generate and track additional engagement, driving more prospects and greater intelligence.
Popcorn will give you a specific targeted list so you know exactly who you are going to contact, and more importantly, why it is worth the effort.
Using popcorn‘s automated lead generation, you can quickly identify the contacts who are Hot, Warm or Cool, based on their engagement across email marketing and website activity.
You can then choose how to target these prospects based on their engagement activity. For example, you may want to phone a ‘Hot’ prospect, target another prospect with email marketing or move ‘Warm’ prospects into a monitoring column in your sales pipeline.
To identify these prospects:
Use the ‘Report’ section on the dashboard, manage them via your prospect pipelines, or use the ‘Filtering’ tool located at the top of every list of contacts.
Although popcorn automatically monitors and score contact activity across email marketing and website activity, you can also set up your own automation to streamline the right prospects for you. For example, they might be contacts who engage in specific ways on your website or email marketing or they may have actions applied to them in the sales pipelines/campaigns or birthdays to bring up their engagement.
When these actions are identified, it enables you to trigger specific events to happen, such as:
- Adding or removing contacts from pipeline columns
- Sending an email/sequences
- Adding reminders
- Applying/removing tags
- Adding/removing from campaigns
When these rules are applied, contact engagement and their score will increase which will improve their prospect rating. As those prospects get warmer, popcorn will move them along your pipeline for you.
When you apply automation to a campaign folder, you are able to set up triggers to specific actions.
For example, it will automatically move your contacts into different pipelines when they have visited a specific page on your website or when Tags are applied, or when contacts are added/removed to specific Campaign folders.
You can decide what their purposes are within popcorn, but by setting up rules you will have a clear and simple visual of where every contact is located in your sales process.
Pipelines
Sales pipelines give you the ability to recreate your sales process in a highly visual and customisable way.
You can find them both on the Dashboard and under the Pipelines tab at the top of the login page.
Sales pipelines enable you to recreate your sales process in a highly visual and customisable way.
You can find them on the Dashboard, inside Campaigns and under the Pipelines tab at the top of the login page.

Pipelines are managed via the contact folders. It enables you to join up the pipeline activity (Email Marketing, Lead Generation, Landing Pages and Automation) to obtain detailed statistics so you can target these groups in the future.
A sales pipeline is visual representation of the journey a contact makes to become a customer and beyond. Think about and plan the key steps you take during this process.
You can create a pipeline for each step. Popcorn’s pipelines are interactive which means you can drag your contacts from one stage of their journey to another. Doing this allows you to see where they are in the process. It provides an instant visual overview of the opportunities, prospects and customers, allowing you to manage your sales easily.
Popcorn allows you to add/name as many columns as you need to create your sales process and you can reorganise them at any time to suit your business.
Users on our Nurturing package are able to send an email to all the contacts in that sales pipeline, by clicking on the 3 dots located at the top of the column.
Creating a customisable pipeline allows you to mirror your real-world process into popcorn. You can create the number of pipelines you need and add the number of steps (columns) into this process. Everything is highly visual, you can rename and drag both columns and contact to ensure that they match your personal processes.
To create a new pipeline:
Click the ‘Campaign’ you wish to edit
Click the ‘Add New Column’ button located on the right-hand side of page, name it and drag it into the position you require.
To rename the pipeline:
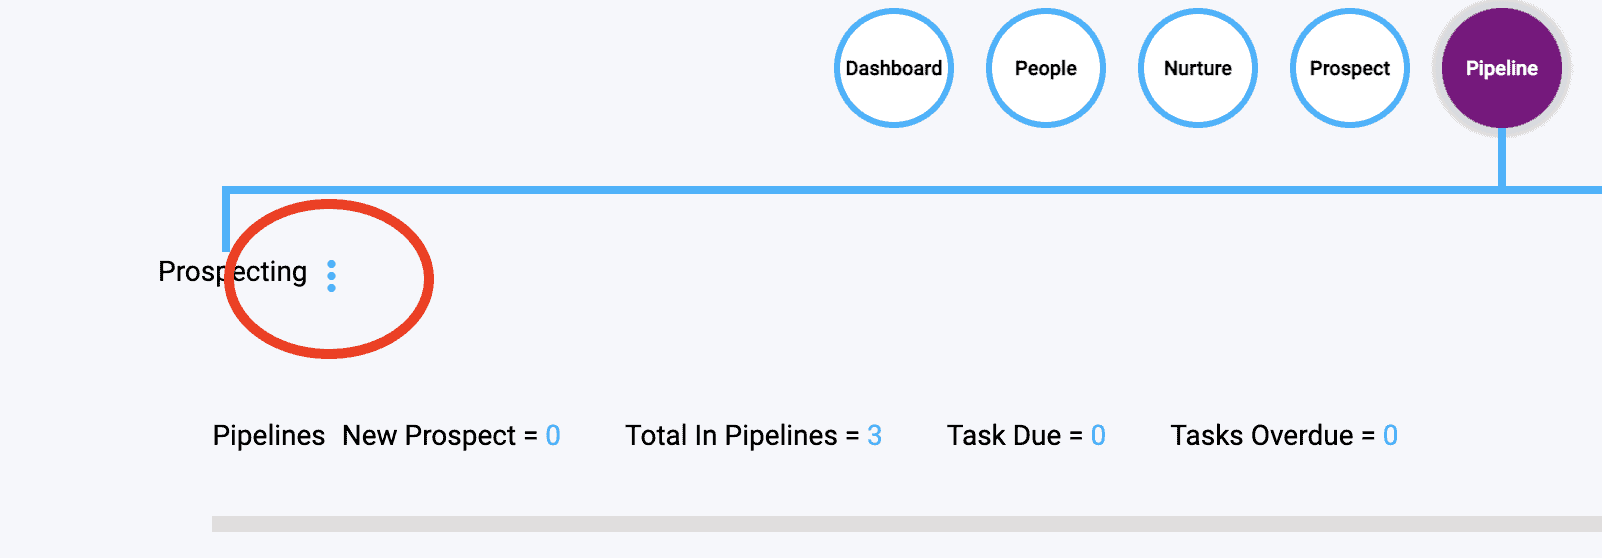
Click on the three dots at the top and click ‘Edit’.
This can be done in two ways.
Via the campaign pipeline:
Click the blue ‘ADD prospect’ button on the top right-hand side.
Above the pipelines, search for the contact by name in the pop-up box.
Select the pipeline and the position that you wish to add them to.
Click ‘Add’ and the contact will appear in the relevant pipeline
Or:
When inside the contacts pop-up, click on ‘Targeting’ tab at the top.
Select the pipeline you wish to add them to. The drop-downs at the bottom right-hand corner of the screen will give you a selection to choose from.
This
When inside the contacts pop-up, click on ‘Targeting’ tab at the top.
You will see a list of all the pipelines / campaigns that the contact is connected with, simply click on the cross to the right of the pipelines / campaigns you wish to remove.

To manually add a Tag:
Click ‘Details’ tab of the contact popup. You can either click on one of the previously used tags (bottom right) or start typing in the search box (above existing tags). When you start typing, the existing tags will display the relevant selection.
Or you can add a new one:
Click ‘plus’ (+) symbol in the search bar.
To add Tags to a larger group of contacts:
- Click ‘Contacts’
- Apply a ‘Filter’ (read more on segmenting and filtering below)
- Select the contacts you wish to add the Tag
- Click Actions > Add the tag you want to apply from the dropdown.
Managing the contacts within your sales pipelines can be done in two ways:
Drag and Drop – Drag and drop your contacts to adjust the order or pipelines you wish them to be in.
Column Filters – Click on Drop Down button beneath the 3 dots of the column you wish to filter. It will give you the option to filter based on prospect level (Hot, Warm, Cool, Cold and Recent)
You can also search based on the contact name.
Sending an email to the entire sales pipeline:
In your sales pipelines – Click on the 3 dots at the top of the pipeline. Select ‘Email’. This will add all the contacts to an email you wish to send.
Or:
Using the filters tool:
- Select the dropdown ‘Advanced’ > ‘Pipeline’
- Click ‘Add’
- Click the grey box to select the pipeline you want
- Click ‘Filter’, all contacts will appear in the pipeline
- Click ‘Actions’ button to send an email to all
‘Pipelines’ are inside the ‘Campaign’ folders. You can create multiple campaigns – this can be accessed via the ‘Campaign’ tab at the top of the page. There is an option to add up to 3 pipelines to your main ‘Dashboard’. To do this -Click on the blue ‘+’ circle at the bottom of your dashboard.

The number of pipelines you can compare on the Dashboard is currently limited to 3. We are planning to increase this in the future.
The number of columns you can add to a pipeline is unlimited.
We recommend that you keep it to a usable size for your business. It is easier to break your pipeline down into multiple stages to keep track of all your contacts. They can be viewed simultaneously on the Dashboard.
To change the pipelines displayed on the master Dashboard – Click the drop-down menu above each ‘Pipeline Overview’. Select the one you wish to display.
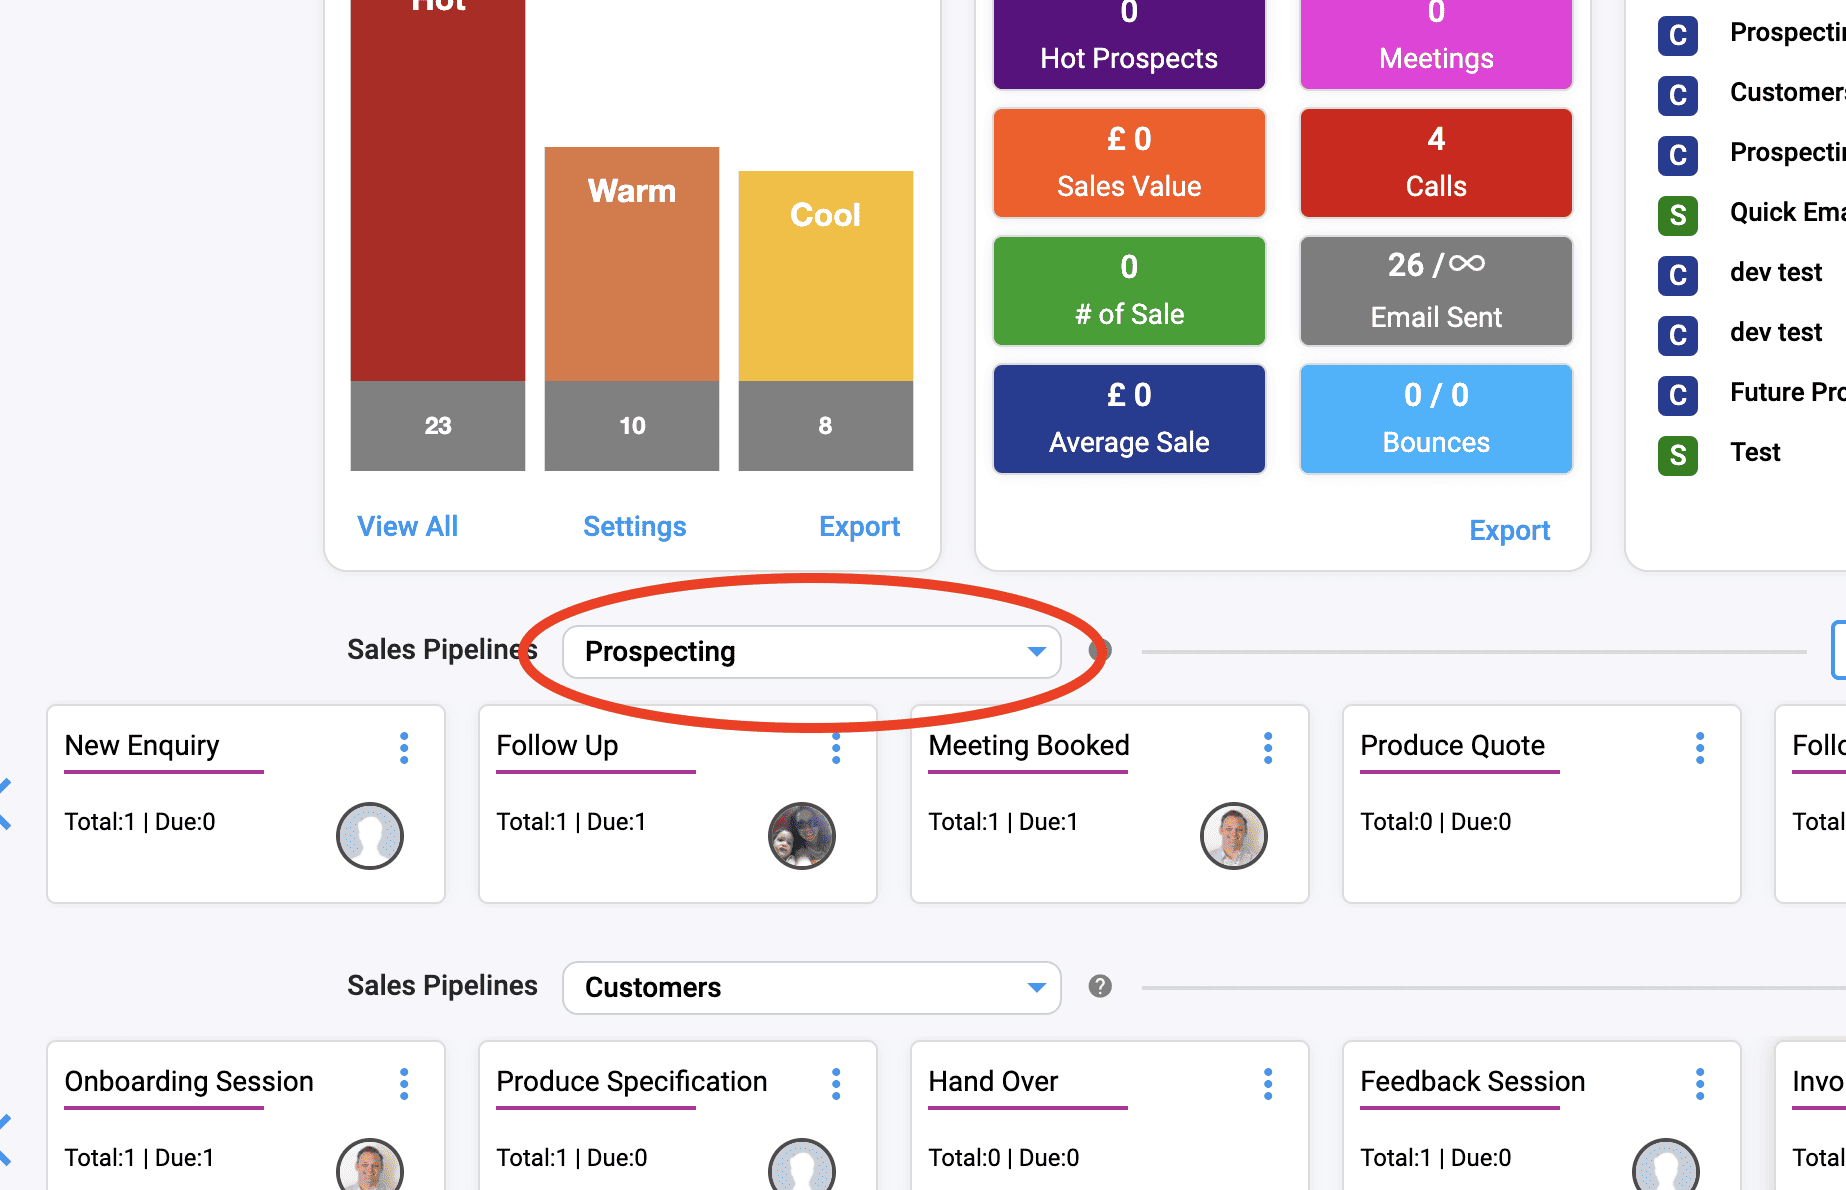
When you delete a column from a pipeline (done via the 3 dots at top of the column), all contacts will be removed from the pipeline.
Note: A warning is given before it is deleted. Once a column is deleted, it can be re-added if needed.
The border colours of the contact lozenge rings represent prospect levels.
This is an automated process for users on the Prospecting package. It tracks and scores behaviour across Email Marketing, Website Activity and Website return visits.
Red = ‘Hot’ Prospect
Orange = ‘Warm’ Prospect
Yellow = ‘Cool’ Prospect
Grey = ‘Not’ a Prospect
The scoring can be modified in ‘Account Settings’.
To change the name displayed in the pipelines from the individual’s name to a company name:
Click on the contact’s name to pop up their profile,
Click Edit, Tick the box next to the company name and Save.
When the pipeline page is refreshed, the company name will be displayed.
The Dashboard provides an overview of your pipelines, but if you want a more detailed overview, you must go into the specific campaign folder. This can be done in 2 ways:
Click on the pipeline in the dashboard/pipelines page. This will load you straight into the pipelines tab.
Or
Click on the campaigns page and select the specific campaign you want, then click on the Pipelines tab.
To change the name of a pipeline:
Click on the Campaign, then click on the 3 dots next to the campaign name. A popup window appears which will allow you to change the name.

'+' Menu
The ‘+’ menu is your quick access to the most commonly used features in the platform.
The ‘+’ button (also known as the ‘quick menu’) is at the top of the page, when logged into popcorn CRM).
Fast click on ‘+’:
– Create a Quick Email
– Create a New Campaign
– Add New Contact
– Log a phone call
– Import new data
– Start a full system Export

There are 3 ways you can send an email in popcorn.
1. ‘Quick’ Email
2. ‘Campaign’ Email
3. ‘Personal’ Email
The quick email is designed for sending a message to one or multiple contacts – it is usually a one-off and not part of a campaign.
Once your email is opened, there are 4 steps to complete before it can be sent:
Step 1 – contains your basic contact information that is sent out with the email.
Step 2 – where you can design your email by using the ‘Drag’ and ‘Drop’ editor
Step 3 – where you can select the contacts that you want the email to be sent to
Step 4 – where you send/schedule your email.
When an email is scheduled and sent, Step 5 will appear and shows all the usual email marketing analytics.
Any ‘Quick’ emails sent will be recorded along with all the contacts tracked actions in the individual contact popups.
There are 3 ways you can send an email in popcorn:
1. ‘Quick’ Email’
2. ‘Campaign’ Email
3. ‘Personal’ Email
A ‘Campaign’ is where you can target and nurture groups of contacts around specific messaging. Email Marketing is one of the tools within the nurturing section.
When you send a ‘Campaign’ email, it will be sent to everyone in the ‘People’ section. This avoids repetition when selecting contacts as they will always appear there.
‘Call’ enables you to quickly add notes/reminders to a contact without having to open their profile.
This is useful when you have a call come in or you want to quickly phone someone:
Search for the contact, their contact details will be displayed – you can add your note/reminder and associate it with a specific campaign (if you opt to).
The note will be added to the contact’s timeline and the call will be recorded in the statistics.
If you are initiating a ‘Call’ from within a campaign folder, it will automatically associate it with the campaign you are currently in.
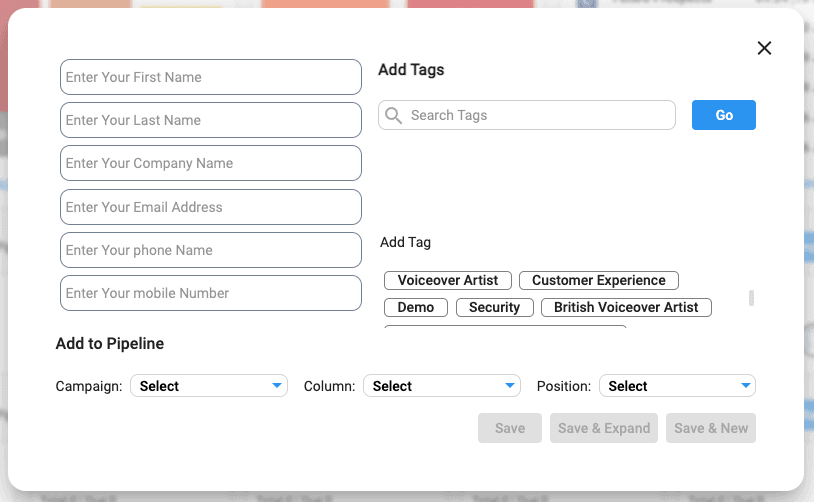
‘Contact’ enables you to quickly add a contact to popcorn CRM.
You can add the basic contact information, Tags and add someone to their first pipeline.
NOTE – The only information required is their Email address.
The following options are available:
- Save – Saves and closes the popup
- Save & Expand – Saves and opens the full contact popup
- Save & New – Saves and pops up another new ‘Contact’ window.
This is a quick link to the ‘Import’ Wizard.
Clicking this link initiates a full download of all your data.
This process can take a few minutes. Once ready, it will automatically download in your browser as a spreadsheet.
Importing/Exporting
Getting your data ready can be a daunting task, but we’ve designed popcorn so your data transference is as simple as possible. Read our handy guides to find out more!
Most importing issues our users face are usually fixed in a few minutes.
The first step we recommend is to export your data into a .CSV file, ensuring that there is only one ‘Sheet’, and to remove any unwanted columns. Doing this usually fixes most importing issues.
If you’re still worried, we’ve put together a handy guide on ’10 Common Errors That Stop You Importing Data’ to resolve these typical issues – before you even open popcorn.

Quick check! If you have done the following 3 tips, it will head off 90% of importing problems!
- Saved your file as .CSV?
- Added a descriptive name at the top of every row you want to import?
- Ensured there is only 1 tab in your spreadsheet?
Once you have done this, importing your data into popcorn is really simple!
- Export your data from your existing software
- Import the spreadsheet into popcorn via the ‘+’ button > Import at the top of every page
- The importer will then guide you through the easy mapping process.
We are currently developing a connection with Zapier, which will allow us to easily connect to over 3500 applications – so you will be able to quickly and simply move your data around. Keep a lookout for this in 2023…
You can import both .CSV and Excel file into popcorn. BUT, .CSV format is the best format to use, it removes all the stuff (Uni Code) that is hidden in the background of an Excel spreadsheet, and causes most of the importing problems our users experience.
If your data is spread out over different spreadsheets, you can import all the exported spreadsheets into popcorn, where they will be automatically de-duplicated. If duplicates are found, you will be asked how you want to deal with them: you can either Update, Ignore or Replace them.
You’ll then have a clean and simple to use database, so you can discover the golden nuggets even faster!
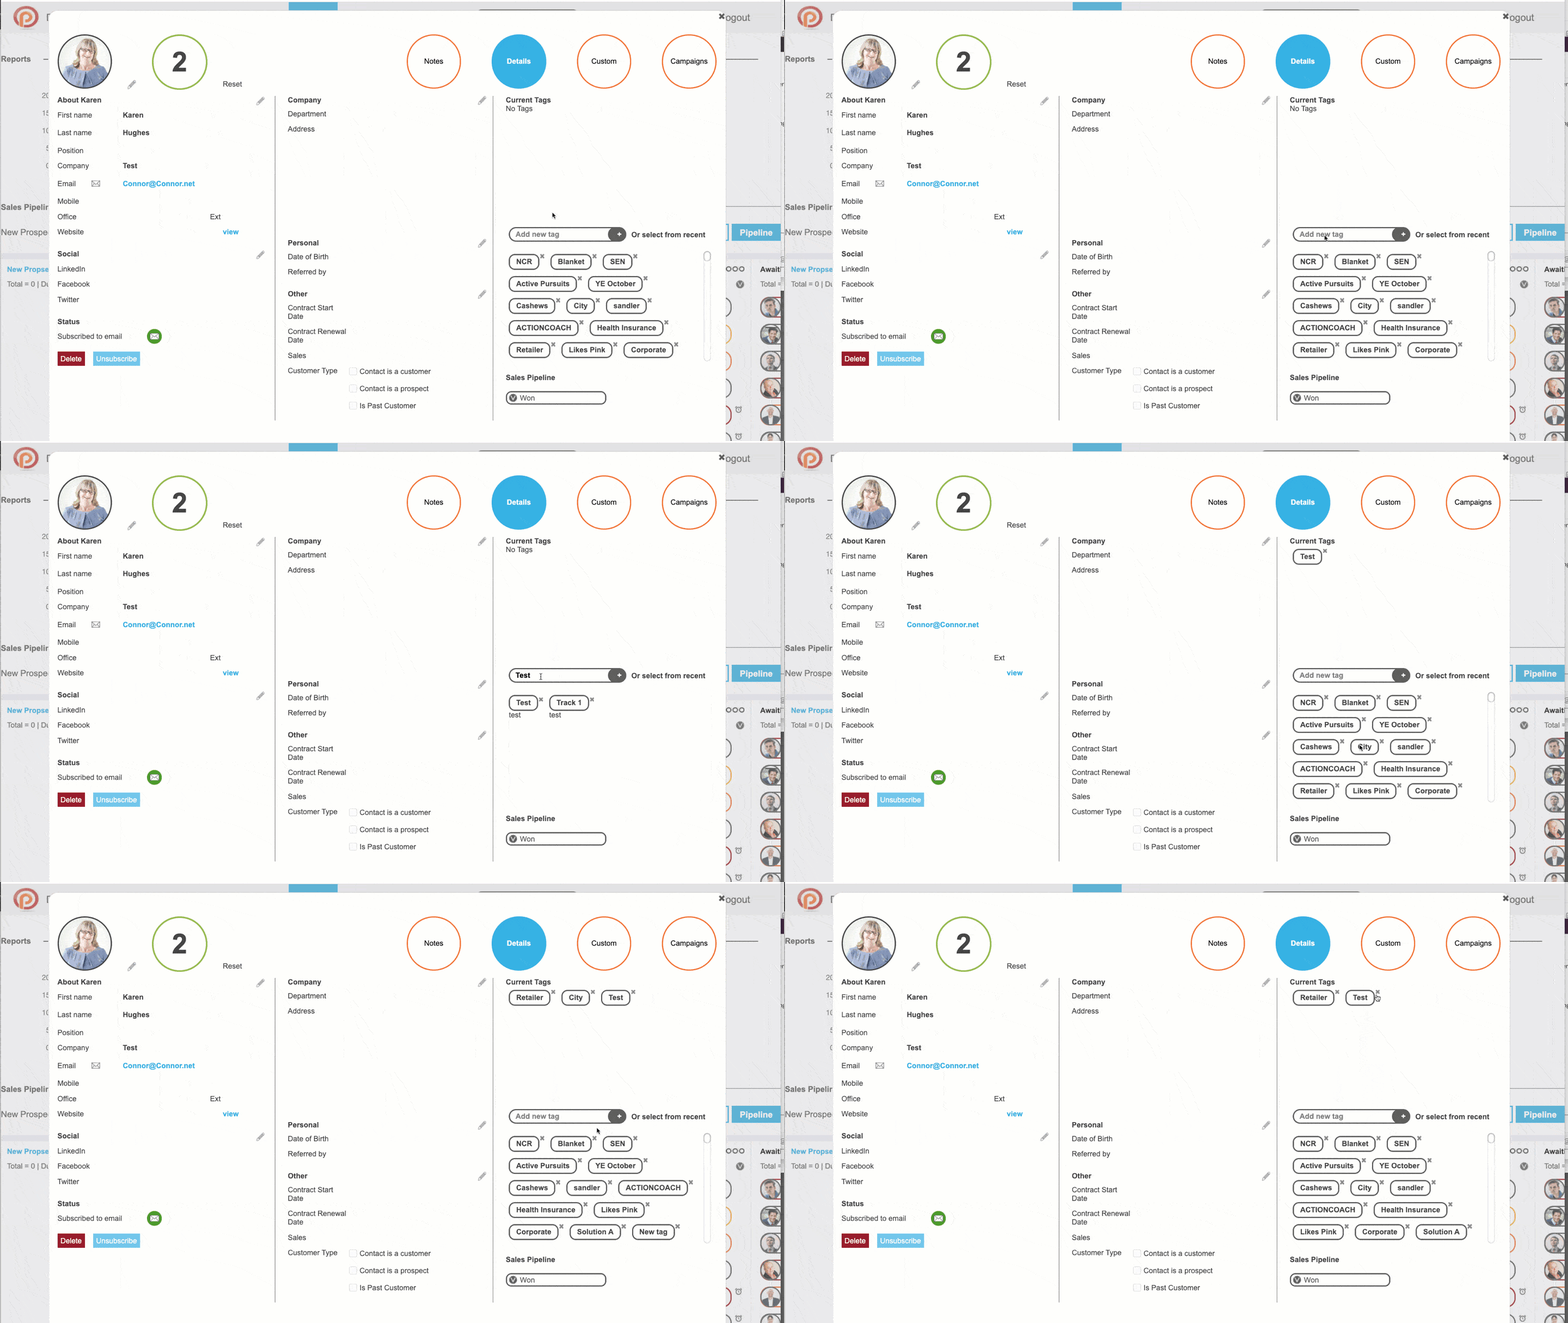
Adding tags to your contacts is a really simple and powerful way of helping you to manage and segment your data.
To add this data before importing into popcorn, simply add a column to your spreadsheet called ‘Tags’ and then add the tags you want to the relevant contact rows. You can separate each word with a comma, to identify the different tags, i.e. Tag1, Tag 2, Tag 3, etc…
Once you have imported the data it is really easy to add extra tags via the contact popup or in the Actions section.
Watch the video below to see this in action!
Simple – anything you like!
During the import process, you can map your existing columns to the fields that are already in popcorn, so you can make your sales process exactly how you need it.
Not at all! popcorn has a simple to use mapping tool that allows you to customise your spreadsheet columns within the fields popcorn provides. There are 10 customisable fields for you to take advantage of, too.
Top Tip! When importing your data, it is best to export your data into a .CSV file, as this removes hidden code (unicode) inside Excel spreadsheets and can cause errors when importing.
popcorn will automatically de-duplicate your data as you import it, flagging up duplicates at the end of the process.
At the same, popcorn flags up any lines of data that it could not import. You’ll then be able to download a spreadsheet with all the excluded data, including explanations for why each item wasn’t able to download.
popcorn de-duplicates based upon email address.
Your Account
Your Account section of the website is where you manage all your settings and personal information, including adding new users, packages and invoices.
If you have deleted a contact / Email or Campaign from within popcorn, you can now restore it up to 30 days after deletion.
To do this, siply go to YOUR ACCOUNT > USERS and click on the user that deleted the contact. The USER POPUP will then appear with a list of actions that can be restored.
popcorn automatically generates an invoice for you, shortly after the payment has been received. Once logged in, simply click the link below to view and download a PDF.
YOUR ACCOUNT>ACCOUNT>INVOICES
You can upgrade / Downgrade your account at any time. Upgrades will be applied and charged for immediately and Downgrades will be implemented at the end of the billing period.
To do this go to:
YOUR ACCOUNT>ACCOUNT>PACKAGES
Then select the desired package from the drop-down list.
You can cancel your account at any time and your account will be active until the end of the billing period, and no further payments will be taken.
All data will be held on our servers for up to 3 months from the cancellation point, at which point the account and all your data will be deleted.
Free accounts, will automatically be cancelled after 3 months without a login, data will then be deleted 3 months after that point.
To do this go to:
YOUR ACCOUNT>ACCOUNT>PACKAGES
At the bottom of the page select ‘Cancel Accout’
To add additional users to your account, go to YOUR ACCOUNT > USERS and click the ‘Add’ Button.
In the popup, select User type as ‘Account User’, enter the users email address (if they are not already in your CRM, click the ‘Add’ lin that appears below) and then Click the Blue ‘Add’ button at the bottom of the window.
The user will then receive an email inviting them to activate their account.
Once this has been completed they will be able to login and use popcorn.
You can change your password in 2 ways:
- Via the User popup – go to YOUR ACCOUNT>USERS. CLick on the name your wish to change the password on. Once the popup has opened, click ‘EDIT’ (Bottom of screen), then update your old and new passwords in the Password Section. Then Click ‘SAVE’
- When trying to log in, click the Forgot Password link, You will then be emailed with password reset instructions.
Please click HERE to learn how to find and implement the website tracking.
Opt-in forms allow you to add a form to your website, to capture data and automatically add it to your popcorn CRM account.
popcorns opt-in forms allow you to also define which campaign the contact is added to, meaning you can automatically start segmenting and targeting your contacts from the moment they sign up.
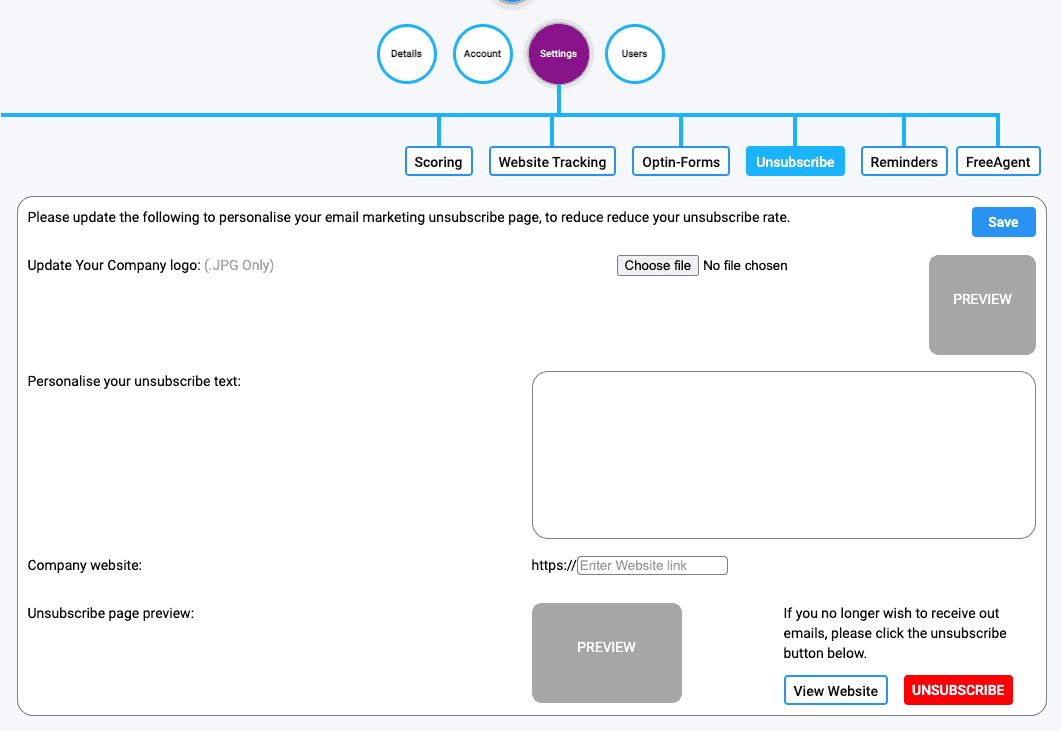
By using the personalised Unsubscribe page in settings, you will reduce the number of opt-out, as it gives a contact a second chance to once they see that you are the sender,
To set up a 10-minute email reminder for all your tasks, go to ACCOUNT>SETTINGS>REMINDERS and toggle it on.
To get CAMPAIGN-specific related reminders, open the campaign you want to receive them from, Click on SETTINGS across the top, then add the users who want to receive daily notifications. Please note that you will also need to add any other users who you want to be able to access the folder, just do not toggle the reminder on for them
Watch this space – details coming soon
To Disable users in your account, go to YOUR ACCOUNT > USERS and click the Check box next to the user, then click ‘Disable’ at the top of the section.
Please note that ‘Disabled’ users still count towards your User allowance, and will need to be deleted to free up the slot.
To Restrict a users permissions in popcorn, go to YOUR ACCOUNT > USERS and click on the required user.
Once the USER POPUP has opened, Click on the ‘PERMISSIONS’ tab. As default, additional users are set with minimum access rights. To change this, Click ‘EDIT’ the toggle the preferences required.
Check your SPAM folders, this email often gets caught up due to the bit of code (Token, for the fellow geeks out there) we have to put in there to activate your account.
If you still can not find it, please use this link to re-send a new one.
Setting up the website tracking is exactly the same as setting up Google Analytics, simply paste the code from the below page into your website header and you are up and running.
Online Support
Running into technical problems or have a burning question that you need to be answered?
We’ve got you covered…
Customer Service is at the heart of popcorn.
If you have a question or need some assistance, we are here to help.
We can support you in 4 ways:
- Submit a support ticket
- Visit the ‘Getting Started’ page – 95% of user FAQ’s are answered in simplistic and practical ways – Visit Page
- Call ‘Support’ (Prospecting and Agency customers only) on 0121 318 8 318
- Book a 15 min Zoom training session (Prospecting and Agency customers only) – Book HERE
If you need to report a bug or if you are having a problem with popcorn, please click HERE or call us on 0121 318 8 318
If you require Tech Support (Prospecting or Agency customers only), please call us on: 0121 318 8 318 or book a 15-minute Zoom support session via this link: Click HERE
CRM-only customers can either access the ‘Getting Started Guides‘ or submit a support ticket. Unfortunately, this package does not cover Phone support.
Office opening hours are 10:00-4:00 pm (UK), Monday to Friday, excluding Bank Holidays.
We aim to respond to support requests within 1 hour, although this is often done much quicker. Please note during busy times, we may take longer to respond.
Office opening hours are 10:00-4:00 pm (UK), Monday to Friday, excluding Bank Holidays.
We have developed a comprehensive FAQ/Getting Started page which answers 95% of customer queries in a simplistic/practical way.
Where possible, we have added photos and short click-by-click videos to help you find your answers as quickly as possible.
Visit: Getting Started Page
Please report any bugs you find via: ‘Report a Bug’ page. We will view it and respond promptly.
Our office opening hours are 10:00-4:00 pm (UK), Monday to Friday, excluding Bank Holidays.
Email Marketing
Highly visual and simple tools such as popcorn’s drag + drop editor, spam filter checking, with full integration – ideal for nurturing sales prospect along their pipelines.

A single email is perfect for sending a standalone email to one or many contacts.
With a campaign folder, you can mange a group of contacts around a specific topic; sending email marketing, identifying prospects, adding automation and setting up landing pages. It is perfect of on-going communications to a group of targeted contacts that you want to manage, nurture and convert.
Watch this video to learn how you can quickly and easily set up your first email, including how to add your contacts and use the email editor.
Want to create some exciting emails but not really sure where to start? In this video, popcorn founder, Simon, shows you some basic steps to create fantastic looking templates for your emails. Keep it simple whilst making it look professional!
There are two ways that you can trade your first campaign.
- Click on the ‘plus quick’ menu and click ‘campaign’. This opens a window for you to name the campaign.
OR
2. Click on the ‘campaign’ page in the top right of your login screen, then click ‘new campaign’. The same window and quick menu will pop up which allows you to see all the other campaigns and quick emails on one page.
The video below shows you how to do all of the above and the different elements included in a campaign.
[/video
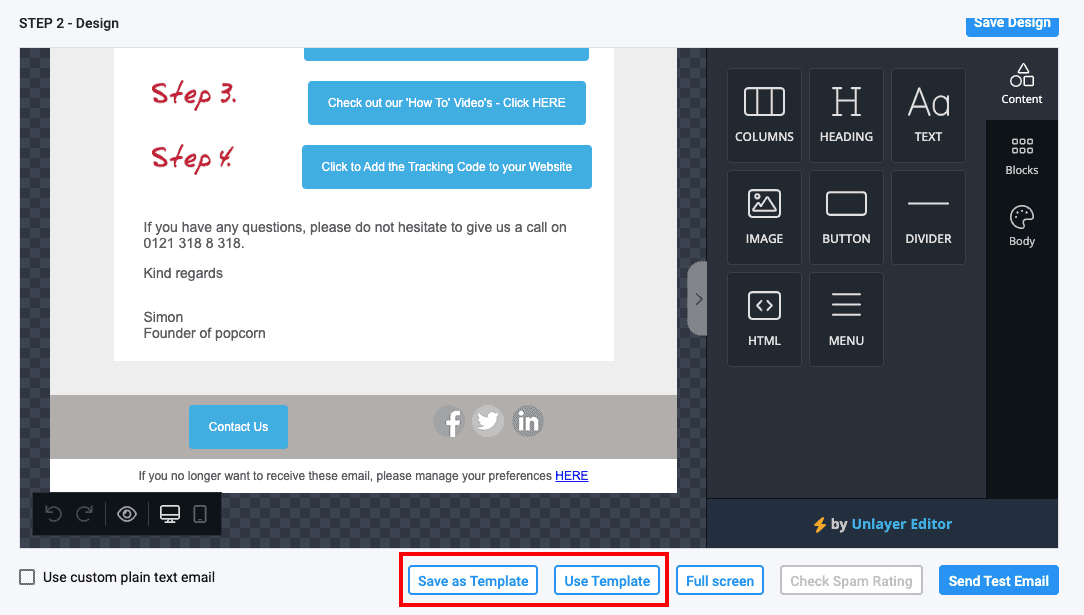
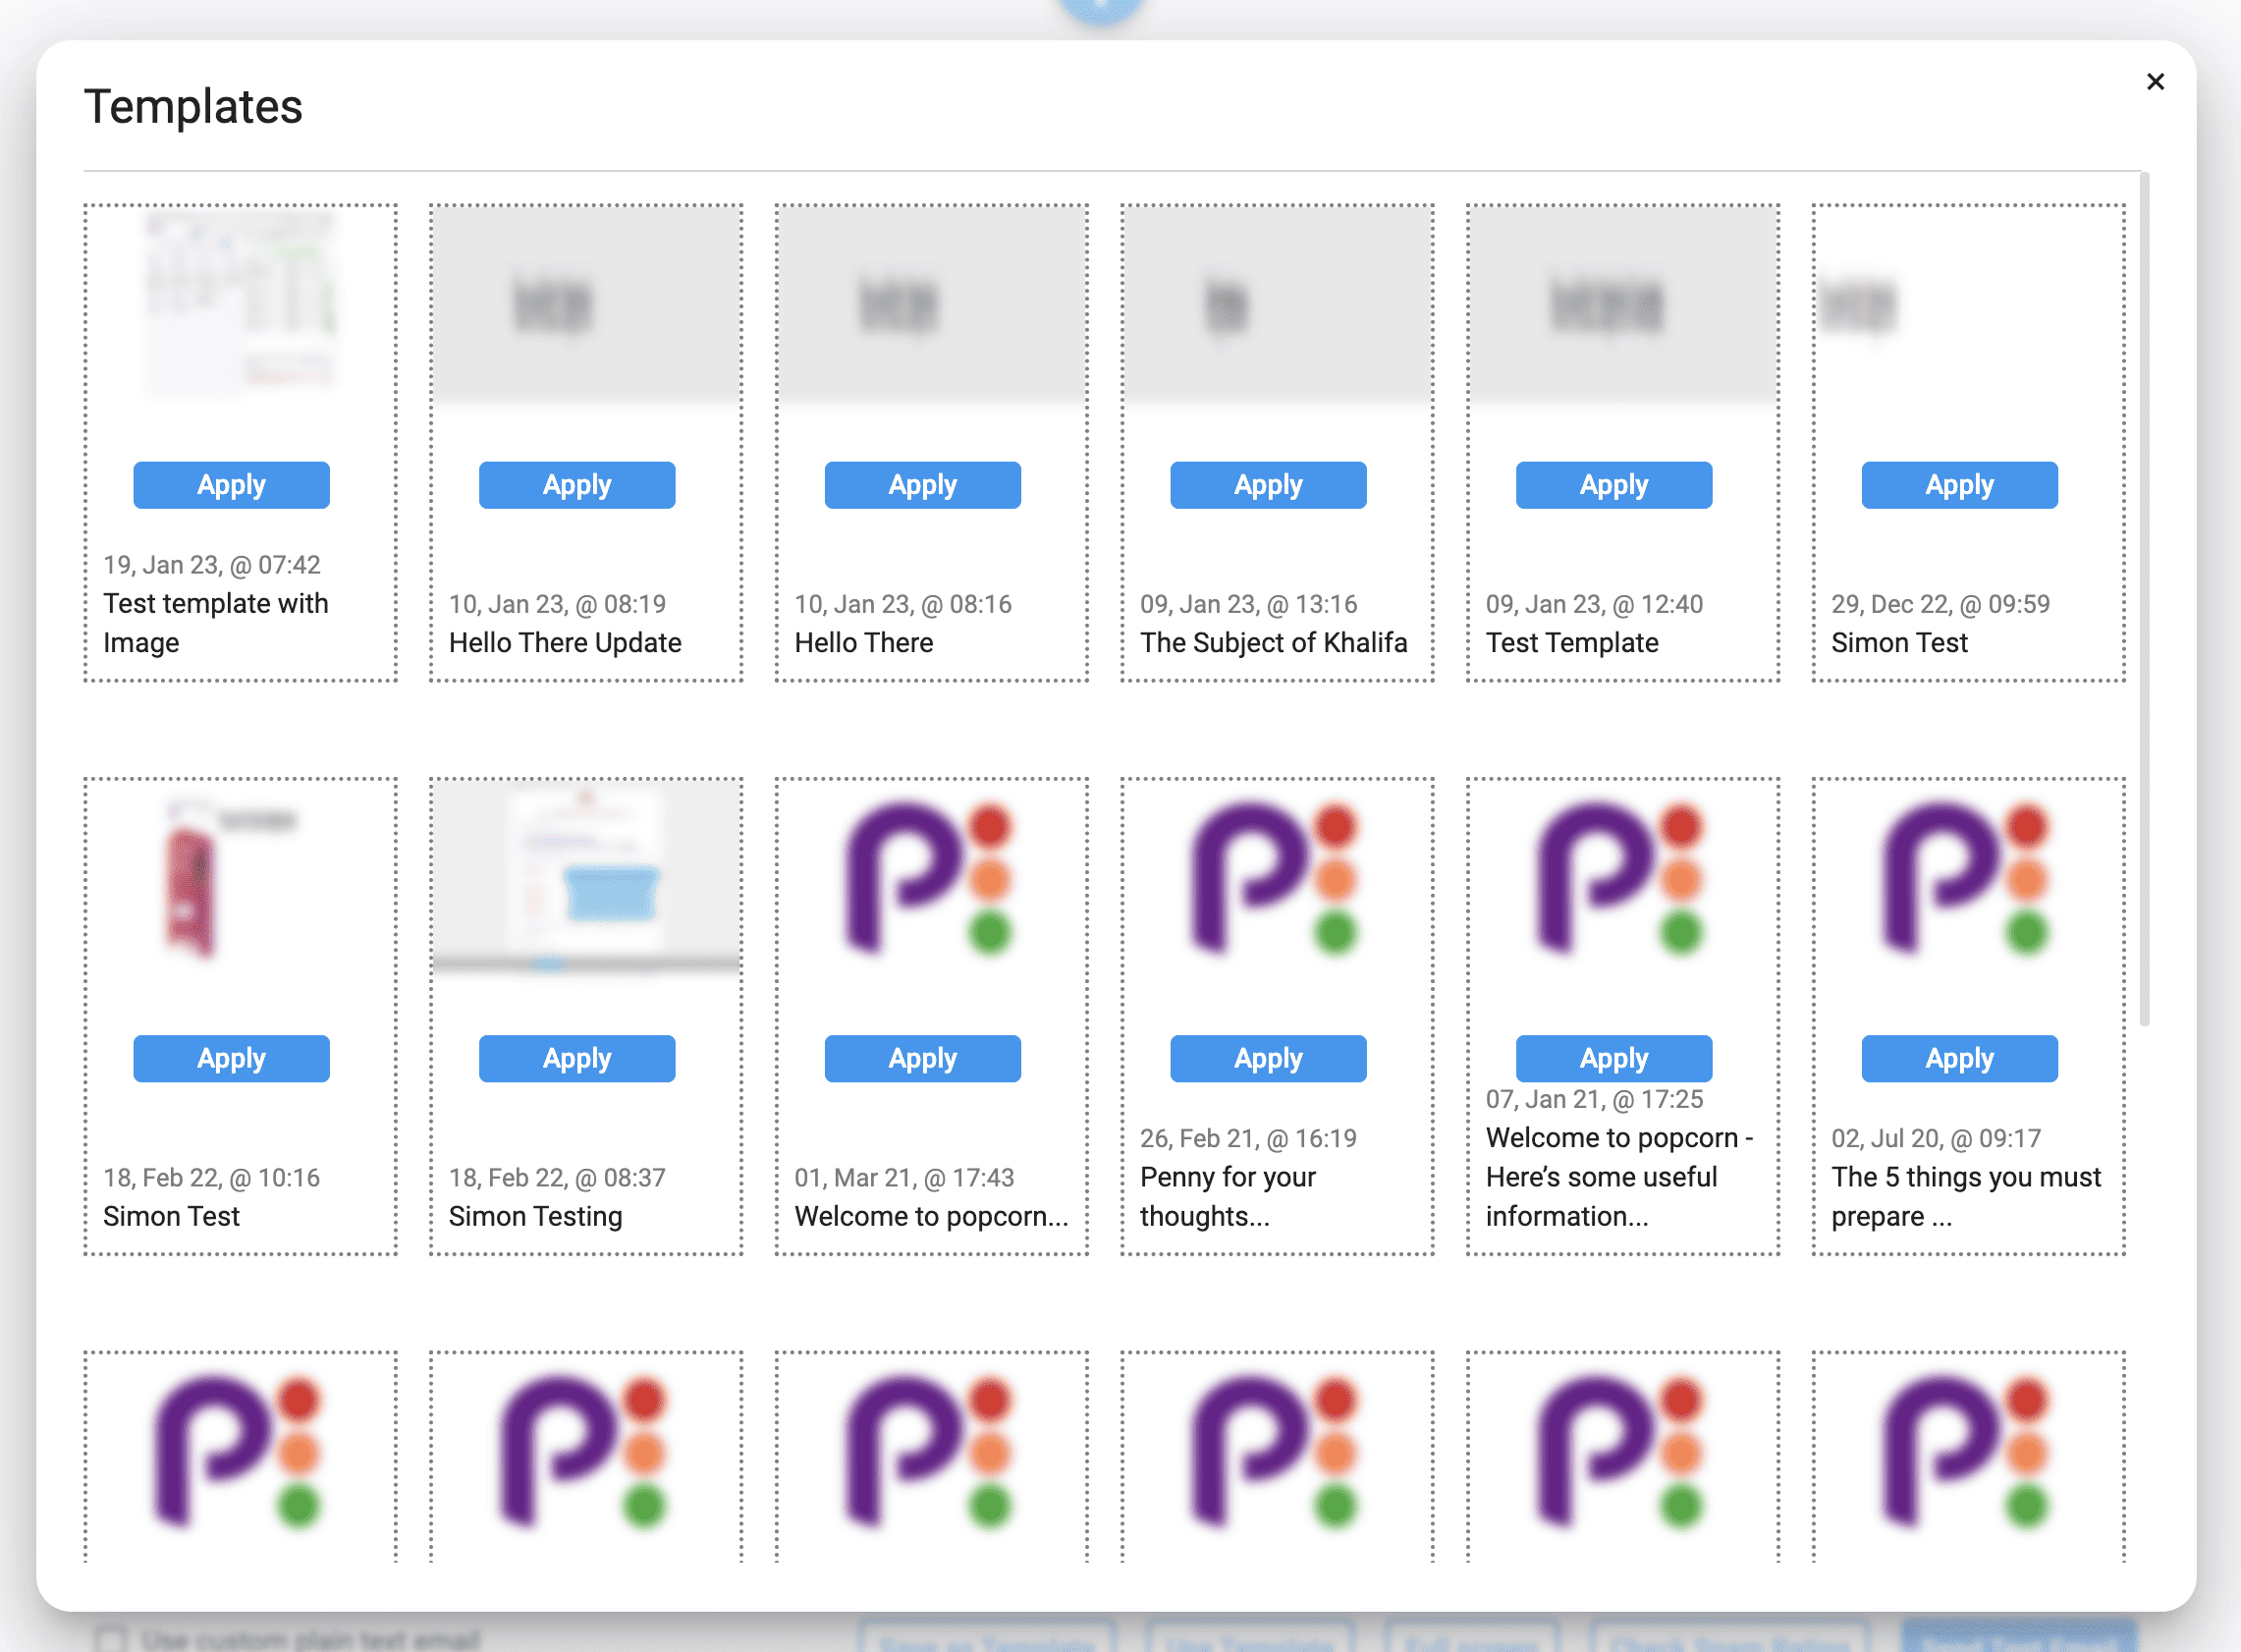
There is nothing more frustrating than designing a stunning email and having to recreate it again. popcorn’s simple email templating tool allows you to quickly save and re-use email designs – all in a click of a button!
Once you have saved your email, click on ‘Save as Template’ button beneath the editor. This will save it with your subject name and time/date as a reference, so you can see which is the latest version. To reapply the design, open a new email and click the ‘Use Template’ button beneath the editor. Once this has loaded, you can start re-editing your design.
Email marketing gives you amazing reporting and insights into customer behaviours. There are two different types of reporting in popcorn, both allow you to streamline specific details by clicking on any statistic or specific contact action:
Quick Reports – this is top-level reporting that allows you to see overviews for your contact, it can always be seen at the bottom of a sent email or on the overview card in the Campaign list.
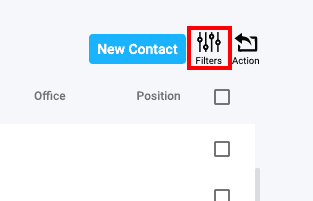
Advanced reports – the ‘Filters’ button found at the top of any contact lists in popcorn is where you can start segmenting based on multiple categories. It incudes filters, prospect levels, email opens, website visits, reminders, activity dates, etc…
- popcorn enables greater visibility of all the actions you have taken in the CRM by connecting all the essential parts of software a small business uses. You can easily segment your data and organise your contacts not only based on tags but also on engagement across email marketing, website, tasks, etc.
To filter your contacts, click on the ‘filtering’ tab that appears at the top of every list of contacts inside of popcorn.
You may select any one of the below, or a combination to narrow down your result further:
- Prospects: Hot, Warm, Cool
- Subscription Status
- Activity Dates
- Email Opens/Not Opens
- Email Clicks/No Clicks
- Specific Webpage Visits
- Task Due
- Recent CRM Activity
- Dates Added to system
- Campaign Activity
- Tags Included/Excluded
- ‘AND/ANY FILTERS’ – all applied filters will apply ie. if you added a Tag of ‘Birmingham’ and ‘Designer’, the contacts displayed must have both tags on them
- ‘OR/ANY FILTERS’ – any applied filters will be applied ie. if you added a Tag of ‘Birmingham’ and ‘Designer’, the contacts displayed will have either or both applied to them.
popcorn was designed with you in mind – so we created as much personalisation as we could!
All of your personalisation is synchronised through popcorn’s CRM system, so any information you need for your email marketing will be automatically pulled through.
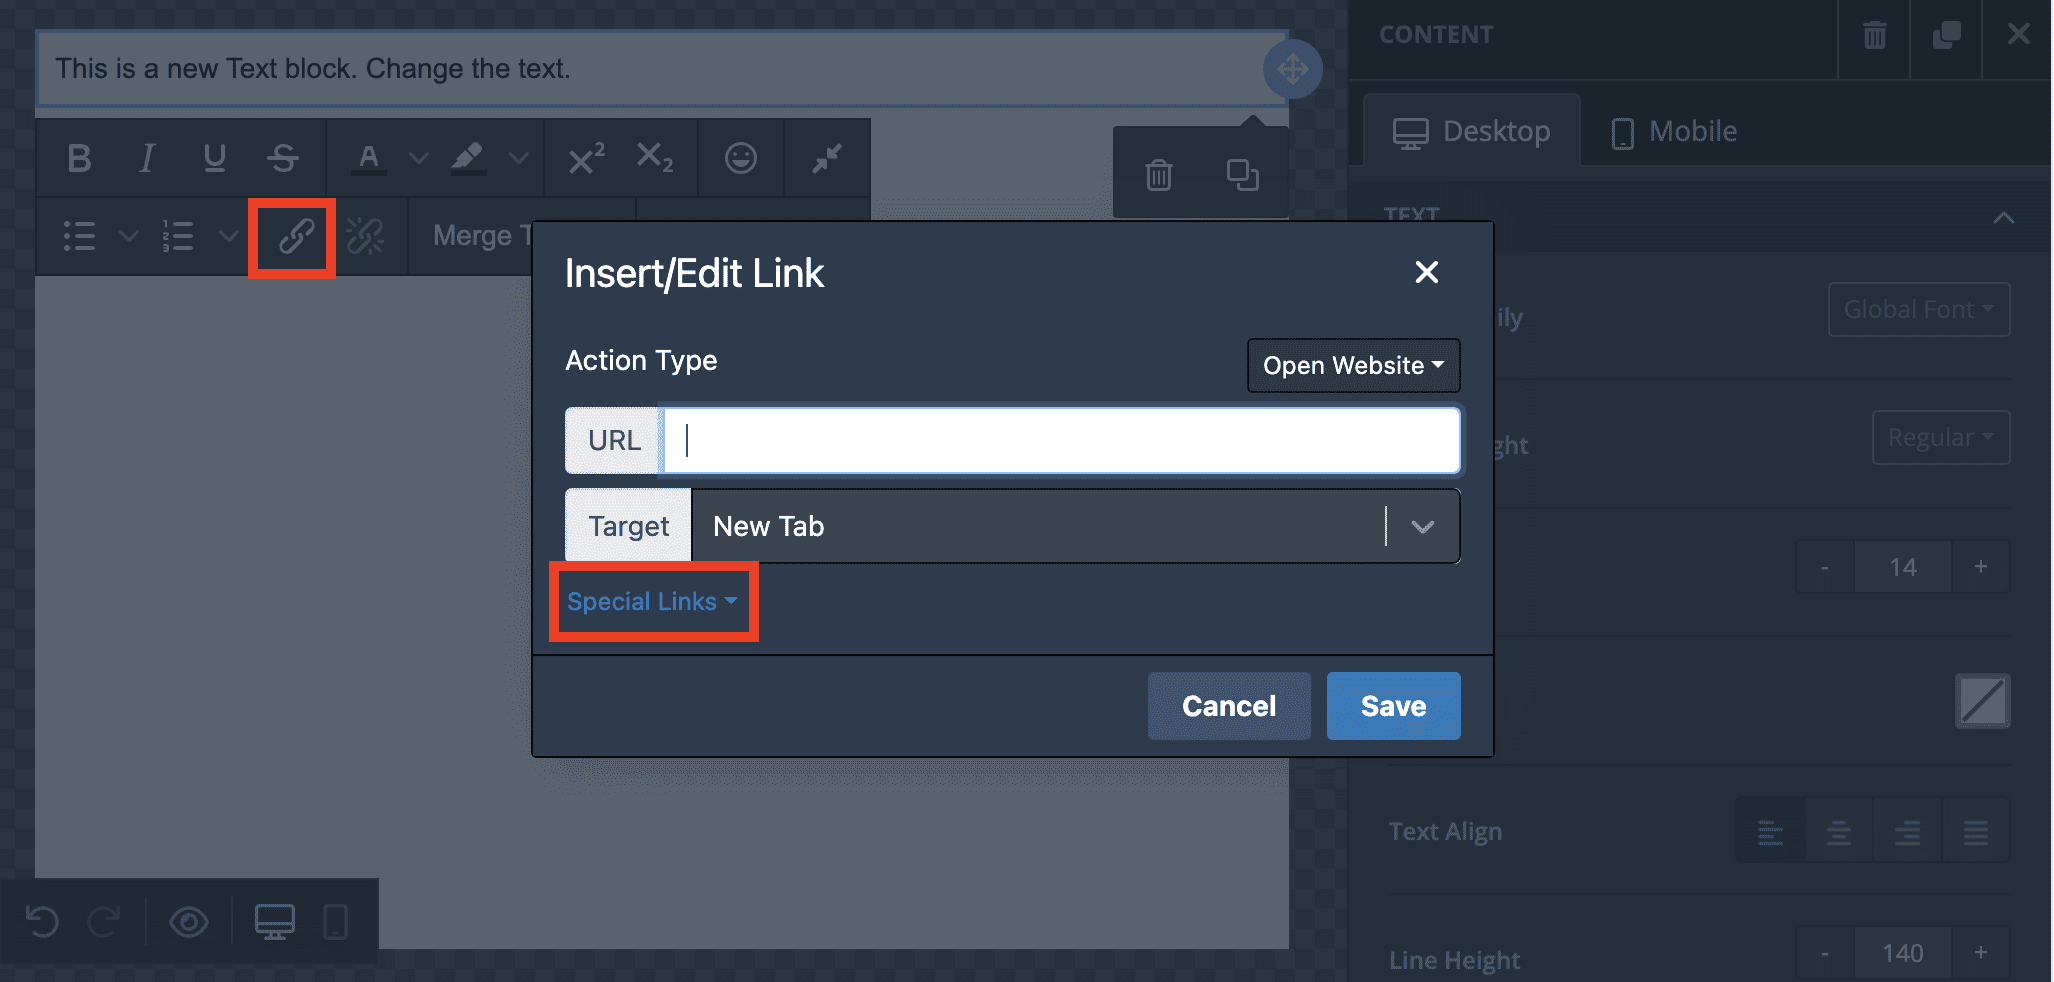
To add personalisation, drag a text block into the email editor and click on it to begin editing. A black box will appear containing all of the editing options and the ‘Merge Tag’ field. Here you can select from your standard personalisation tools plus 10 custom fields.
Please note that personalisation will only be inserted when the email is sent properly, and will not show up during testing emails.
Watch our video to see it all for yourself!
To add a newsletter sign-up form to your website, visit Your Account > Settings > Option Forms, copy & paste the code to the HTML section of your website.
If you wish to direct sign-ups to specific campaign folders, select the campaign folder from the dropdown box, and you will see the code refresh.
This form allows you to capture the user’s full name ( first and last name in popcorn is automatically separated), email address and phone number.
To customise your Unsubscribe Confirmation page, visit Your Account > Settings > Unsubscribe. Here you can add customised text, your logo and your company website to reassure contacts that you are who you are and reduce your unsubscribe rates.
To add your contacts to an email:
- <li “=”” class=” class=” data-css=”tve-u-1764306e27d”>
On the third step of the Creating a Single Email page, click ‘Update’
- popcorn will give you a pop-up of all your contacts
- You can choose to Select All or use the Filters button to segment your data
- Once you have your selection, click ‘Select All’ and ‘Update’
- This will now display the original screen and in Step 3 you will see three new figures:
- 1: The total number of contacts selected
- 2: The total amount of emails that will be sent out (excluding unsubscribes and contacts without email addresses)
- 3: The number of contacts in popcorn that are still available to add.
- If you wish to remove one or all contact, re-click ‘Update’, manually un-tick the names you want to remove OR click ‘Select All’ twice to remove ticks from all the boxes.
We do not recommend attaching files to your emails as this dramatically increases the chances of your email marketing getting caught up in a Spam Filter.
We recommend adding the information as a Blog Post or on your website page. That way, you can track what/when your readers are looking at on your website. All of this will be scored and listed in their contact popup timeline.
If you wish to save and re-use your email designs or apply them to different campaigns:
– Open the email you want to add to the campaign
– Click ‘Save as Template’ at the bottom of the editor
– Open the campaign you want to add it to
– Click on the ‘Nurture’ Tab
– Click ‘New Email’
– Click ‘Use Template’ at the bottom of the editor
– A copy of the email will appear in the Editor, you can update it without affecting the saved template.
Automation
popcorn’s automation features allow you to lift your foot off the pedal on your CRM. By setting up your automation, popcorn will take over tasks that make up your sales process, giving you the time and space to smooth out and expand your engagement.
Automation is part of the Prospecting Package.
To access this:
- Click on a ‘Campaign’
- Click on ‘Nurture’ Tab‘
- Click on ‘Automation‘
- Click ‘New Automation’
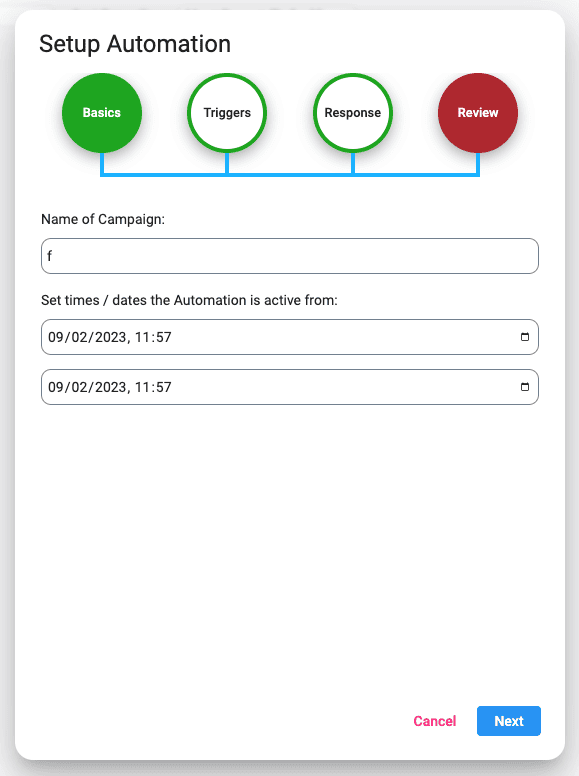
Then follow the Wizard to set up your automation.
Once you have finished and saved it, you will see a list of all automations on the automation tab.
The Automation tools have been developed to enable you to nurture your prospects.
Automation is set up by defining 3 key areas:
- Triggers – These allow you to define how an Automation is started and includes:
- Email Marketing open
- Email Marketing not opened
- A link clicked in Email Marketing
- No link clicked in Email Marketing
- A specific link clicked in Email Marketing
- A visit to one of your website pages
- Multiple visits to one of your website pages
- Adding/Removing a Tag to a Contact
- Adding/Removing a Contact to a Campaign
- A Birthday Date
- Adding/Removing to a specific Pipeline Column
- Becoming a Hot, Warm or Cool Prospect.
- Responders – Define what popcorn should do once a Trigger has happened and includes:
- Sending an Email
- Adding/Removing to a Campaign Folder
- Adding/Removing a Tag
- Adding/Removing to a specific Pipeline
- Adding a Reminder to a Contact
- Adding Points to a Contact
- Sending the account owner a Notification Email
- Delay – Define the time period between the Trigger and the Response happening
Once these three sections have been defined, you can save and set up multiple Automations that apply to contacts within the specific campaign folder.
When you are in the NURTURE > AUTOMATION tab, you will see a list of all the Automations that you have created in that specific Campaign.
To Pause an Automation, click the Status Toggle and it will turn Red.
To Restart an Automation, click the Status Toggle, it will turn Green. You will then have to select the dates that you wish it to be active on.

When you are in the NURTURE > AUTOMATION tab, a list of all the Automations you have created in that specific Campaign will appear.
To edit a specific Automation, click on ‘Edit’ button, this will take you back to the Wizard screen where you can edit any of the steps.

When you are in the NURTURE > AUTOMATION tab, you will see a list of all the Automations that you have created in that specific Campaign.
To edit a specific Automation, click the ‘Delete’ button, confirm the action required and it will be deleted.

An Automation Trigger enables you to define how an Automation is started, triggers include:
- Email Marketing open
- Email Marketing not opened
- A link clicked in Email Marketing
- No link clicked in Email Marketing
- A specific link Clccked in Email Marketing
- A visit to one of your Website pages
- Multiple visits to one of your website pages
- Adding/Removing a Tag to a Contact
- Adding/Removing a Contact to a Campaign
- A Birthday Date
- Adding/Removing to a specific Pipeline column
- Becoming a Hot, Warm or Cool Prospect.
An Automation Response, allows you to Define what popcorn should do once a Trigger has happened, these include:
- Sending an Email
- Adding/Removing to a Campaign Folder
- Adding/Removing a Tag
- Adding/Removing to a specific Pipeline
- Adding a Reminder to a Contact
- Adding Points to a Contact
- Sending the account Owner a Notification Email
When an Automation is running, you can see who has triggered it from the ‘Responses’ in the Automation List.
The number shown tells you the total number of contacts that have triggered the Responder. You can click on the number to see a list of all the contacts.

Each Automation has a Start and End date so that you can define when it should run. This is perfect for running promotions and Marketing campaigns.
A Delay is set during the Response step of setting up an Automation. The delay is the time period between the Trigger and the Response happening.
If you are planning to set an Automation with an Email or a Response that uses Emails, you will need to create the specific emails before setting up the automation otherwise, nothing will be displayed.
Landing Pages
Your customisable, personalised landing pages will solidify your brand presence and professionalism to your customers.
If you have permission to clone a webpage, you need to:
- Click on a campaign folder
- Click on a Nurture tab
- Click on the landing pages tab at the top right
- Click on New Landing Page
- Paste the full URL (including HTTPS://) into the website address field
- Click Copy
The next step can take a few seconds to a few minutes to create a copy of the webpage you pasted in. Once the import is completed, you can click into it and edit text and images as you would with a normal editor. You can also add new elements such as photos, videos etc. from the right-hand toolbar.
To increase engagement, you can add personalisation (name, company, custom fields, etc.) by clicking on a text block and using the merge tag field that appears in the text later.
Please note this feature works on 95% of web pages. If you are struggling to make this work, please try cloning a simple page from your website.
To find a link for a landing page you have created, click on the Landing Page tab within the campaign you are working on, then click the Copy URL button on the relevant webpage tool. You can then paste the link or use it within an email.
We don’t interfere with the hard work you’ve already put in. The website cloning tool does not change any aspect of your live website – it simply creates a copy inside of popcorn and makes it editable. This webpage will only be visible to people you provide the link to.
All landing pages generated inside popcorn are saved on the popcorn platform and do not affect your existing website. The website address for these will have a popcorn address and will not be found on Google.
When popcorn clones a page from your website, it reproduces all of the links to go back to your original site, even if they were internal links before. This way, your contacts experience complete brand consistency no matter where or how they interact with you.
The popcorn landing pages work seamlessly with email marketing and CRM. This enables you to customise these pages i.e. their name, your company, customise fields, etc. If a contact who visits the page has been tracked in your CRM, it will display the relevant personalisation for them.
To add personalisation:
- Click on or add a text box to the page, then click inside the box to edit the text
- When you do this an editor box will appear beside where you are typing and there is a Merge Fields button
- Click on this and it will allow you to select the desired personalisation which will be added to the website page
Content coming soon
Forms
Create customisable, personalised forms to capture data straight into your CRM and Email Marketing.
Website Tracking
popcorn’s unique fingerprinting tool allows you to track your contacts whenever they visit your website, up to 3 months after opening your email.
Don’t worry, we’re not asking for rocket science. Like Google Analytics, you just need to paste the code below into your website header:
When an email that is sent by popcorn is opened by one of your contacts, popcorn automatically tracks the last 5 devices that have opened it and will then replace the oldest one when a newer fingerprint is available.
This means that if that fingerprint/device visits your website any time in the next 3 months, popcorn will automatically start tracking and displaying their activity in the contact popup.
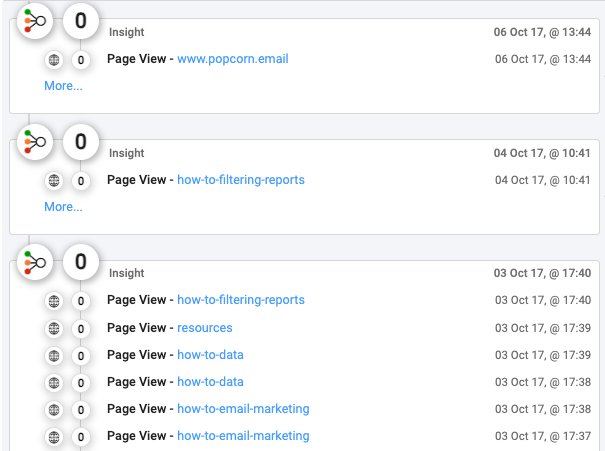
popcorn’s unique tracking tools follow your contacts from email over to your website – even on return visits!
When you click on a contact that you have sent an email to, you can see the precise pages they have viewed on your website. This history covers up to 3 months after the last email was opened.
Once you have installed the website tracking code, you can see the exact pages that your contacts have viewed up to 3 months after they have opened an email from you.
Viewing their statistics can be done in three ways:
- Click on a contact’s name to bring up their information and scroll down through the activity timeline for an in-depth view.
Or:
- Use the Filters button at the top of a list of contacts
- Select the Advanced dropdown > Website > Add
- Click on the grey Website box that appears, selecting/searching for the website you are looking for
- Once you filter this information, it will show you all the contacts who have viewed a specific page
Or:
- Via the dashboard, click on the dropdown in Quick Reports
- Select Website Activity
This will show you a quick report of the total number of visitors to your site over the last 7 days, including the numbers that are being tracked. popcorn also provides extra information such as how many visits per page you’ve received and the specific visitors to those pages.
- Go to Settings in your site’s dashboard.
- Click the Custom Code tab in the Advanced section.
- Click + Add Custom Code at the top right.
- Paste the code snippet in the text box.
- Enter a name for your code.
Tip: Give it a name that is easy to recognize so you can quickly identify it later. - Select an option under Add Code to Pages:
- All pages: This adds the code to all of your site’s pages, including any new pages that you create in the future. Choose whether to load the code only once per visit, or on each page your visitor opens.
- Choose specific pages: Use the drop-down menu to select the relevant pages.
- Choose where to place your code under Place Code in:.
- Head
- Body – start
- Body – end
- Click Apply.
Full Support
Running into technical problems or have a burning question that you need to be answered?
We’ve got you covered…
Customer service is at the heart of popcorn.
If you have a problem or just need some support, we are here to help.
We offer support in 4 ways:
- Submit a support ticket
- Visit the ‘Getting Started’ page, where 95% of user FAQs are answered in simple and practical ways – Visit Page
- Call Support (Prospecting and agency customers only) – 0121 318 8 318
- Book a 15 min Zoom training session (Prospecting and agency customers only) – Book HERE
If you need to report a bug or if you are experiencing issues with popcorn, please click HERE or call us on 0121 318 8 318
If you are looking for Tech support (Prospecting or agency customers only), please call us on 0121 318 8 318 or book a 15-minute zoom support session via this link: Click HERE
CRM-only customers can either access the ‘Getting Started Guide’s‘ or submit a support ticket. This package does not cover Phone support.
Office opening hours are 10-4 pm (UK), Monday to Friday, excluding Bank Holidays.
Typically we aim to respond to support requests within an hour, although this is often done much quicker. During busy times, we may take longer to respond.
Office opening hours are 10-4 pm (UK), Monday to Friday, excluding Bank Holidays.
We have developed a comprehensive FAQ/Getting Started page which answers 95% of customer queries in a simple and practical way.
Where possible, we have added photos and short click-by-click videos to help you get your answers as fast as possible.
Visit the Getting Started Page
Please submit any bugs you find via the ‘Report a Bug’ page, we will review them and respond promptly.
Office opening hours are 10-4 pm (UK), Monday to Friday, excluding Bank Holidays.




Are you ready to get started with popcorn CRM?
*FREE 5 Day Trial of popcorn CRM, then £5+VAT per month. No Set-Up Fees, No Contracts, No Hidden Costs


